
How to boot from a CD-DVD disc when you boot your computer. How to make Windows boot first in Grub How to boot from disk
Often, when repairing a computer, it is necessary to change the boot device. For example, you need to install Windows with CD/DVD or with flash drives,
To change the boot priority of a particular device there is nothing complicated, just follow the instructions and everything should work out.
The first thing you need to do is get into the BIOS itself, you can do this when you turn on the computer and click on DEL (delete), other login buttons can also be used BIOS, please note at the bottom of the screen there is a hint Press BUTTON to enter SETUP. In most cases these are the DEL (delete) and F2 keys, rarely F1,
Let's look at two bios options AMI and Award.
There is a window in front of you
There is a window in front of you

Select an item BOOT then select Boot Device Priority.


1st Boot Device – First device
2nd Boot Device – Second device
3rd Boot Device – Third device and so on
The priority of loading devices is displayed sequentially; if it is not possible to boot from the first device, then boot from the second device will proceed, and so on.
To change the order of devices, select the first item and click ENTER, then use the arrows to select the device that needs to be loaded first.
Having made all the necessary changes, exit the item (button ESC), then select EXIT. The last two actions can be performed by pressing F10- is to get out of BIOS and save changes. To the question “Save configuration changes and exit now?” We answer OK (press Enter).
The computer will reboot and start booting from the device you installed first.
To change the loading order, select with arrows Advanced BIOS Features.

The sequential boot order of the devices is also displayed here

First Boot Device
Second Boot Device - Second device
Third Boot Device - Third device
Select the first device and click ENTER, select the required device from the list, press again ENTER.
Next we leave the point Advanced BIOS Features go to the save and exit point - Save & Exit Setup. Or just click F10. When asked to save the changes we have made, we answer Yes, the letter Y. The computer will reboot and start booting from the first device you set.
If something goes wrong for you, you can always use the “Restore default settings” option. Load Optimized Defaults or Load Setup Defaults.
More from my site
More from my site
Hello! Today I rested all day, it was Sunday. But towards evening I thought that I needed, I needed to write something useful on the blog. I began to think about what I haven’t written yet, and what might be useful to you in the process of solving various computer breakdowns, and then the thought came that I had already written about that, and how I also wrote in it, but there is also a way that when you turn on computer you can select device to download without having to go into the BIOS. I’ll write about this, I’m sure that this advice will be useful to many.
You often have to choose which device to start your computer from. For example, you want to, or simply boot your computer from a boot disk to scan your computer for viruses. And to do this, you have to go into the BIOS, look for where this item is located in which the boot order is set, and also on different computers this is all done differently, and many at this stage abandon the idea of repairing the computer themselves.
If, for example, you need to boot once from a CD/DVD disk or flash drive, then you can do without changing the settings in the BIOS. And now I will tell you how to do this.Selecting a boot device when turning on the computer
We insert the disk into the drive, or connect a flash drive. We restart the computer and as soon as it starts to boot, press the key F11.

A window will appear “Please select boot device:”, in which, using the up and down arrows, we select the device we need from which we want to boot, and confirm our choice by pressing “Enter”. As you can see, I have the opportunity to boot from a drive, a flash drive and, of course, a hard drive.
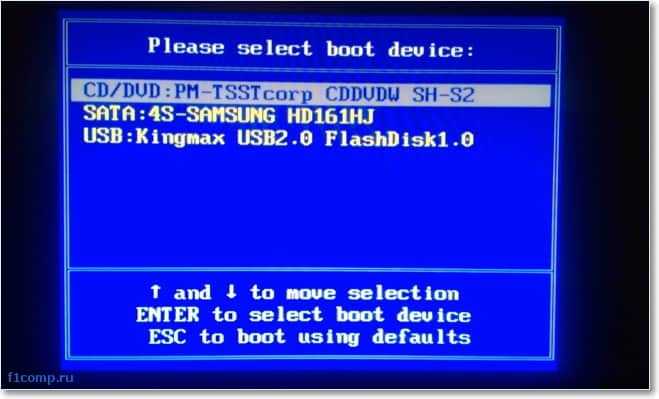
Whichever device you choose, the download will start from that device. As you can see, everything is much simpler than delving into the BIOS settings. If nothing happens when you press F11, then there are at least two options:
- You have a USB keyboard, and in the BIOS settings, support for such keyboards is disabled when the computer starts. You need to connect a regular keyboard, and with its help go into the BIOS and in the Integrated Peripherals item, find USB Keybord support and set the value to Enable. After this your USB keyboard should work.
- And the second case is that you simply have a different key set to call up the boot device selection menu when you turn on the computer, or simply this function is disabled in the same BIOS. For example, in Acer laptops in the BIOS there is an item “F12 select boot device” (or something like that), which must be enabled by setting Enable. After this, the menu will be called up by pressing the F12 key.
It seems like I wrote everything, if you have any questions, ask. Good luck!
Most often, we think about the BIOS (Basic Input/Output System) only when we need to reinstall the operating system and need to somehow set it to boot from a disk or flash drive. I often wrote about this in articles such as:, and others. Now I want to put it together and refer only to this article when necessary. This article will be useful for all BIOS versions and for different companies. A kind of single reference book
The first thing you need to know is that BIOS is divided by manufacturer and version.
To change boot method in BIOS- You must first enter it.
You can, of course, find out what version and manufacturer of your BIOS is from the manual that came with your computer.
You can also find out by looking at the line at the top of the black screen when loading (the manufacturer will be indicated there).
Well, then enter the BIOS, knowing what it is for you.
Some BIOS versions do not have such a screen showing lines. There’s just a logo there and at the bottom it says something like “Press F2 to enter SETUP,” which means press F2. If there is just a logo and there are no inscriptions, press ESC, and then del or f2
Here is a small list of manufacturers and keyboard shortcuts for entering BIOS:
Also at the bottom of the black screen there are keys for entering the BIOS and for displaying a list that contains available devices for booting and so that you can boot from it. But more about him at the end of the article.

As you can see, most often you need to press the key F2 or Del.
Now you need to load a flash drive or disk.
Let's look at a few examples that differ from the BIOS manufacturer.
Setting up Award Bios to boot from a flash drive or disk:
The main window looks like this, in which we need the second item:

Further depends on the firmware version. In one case, you will need to go to an item similar to “Boot Seq & Floppy Setup”

in another case, you don’t need to go anywhere - everything will be right before your eyes

Clicks on First Boot Device(First boot device), click Enter and a window like this will appear

in which you need to select the disk or flash drive that will launch first. You can specify a Second boot device, for example, but usually the BIOS itself fills in this data.
On a note:
If you select a flash drive, then, among other things, you also need to go to the “Hard Disk Boot Priority” item and move our flash drive to the very top using the “+” and “-” or “PageUp” and “PageDown” buttons:

It is also worth remembering that In order for the BIOS to see the flash drive, it must be connected before turning it on or before rebooting
Then press “F10” (see the exact key in the hint at the bottom of the screen called “Save”, “Exit”) or go to the main BIOS menu and select “Save and Exit Setup”. In the red window, select “Yes” using the “Y” button on the keyboard and press “Enter”

The computer will reboot and when booting from the Windows installation disk, the following request may appear for a few seconds: “Press any key to boot from CD or DVD...”

Which translates to “Press any button to boot from a CD or DVD.”
This means that if you do not press any button on the keyboard at this moment, the computer will continue to boot from the next device on the list.
Another version of this BIOS:
I've only seen this on old computers from ten years ago, before 2003. The main menu looks like this:

To configure the boot order, you need to go to the menu BIOS FEATURES SETUP:

At this point, use the PageUp and PageDown buttons (or Enter and arrows) to select what to put first - CDROM or flash drive. DO NOT forget about the second and third device
And further:


How to choose what to boot from in AMI BIOS
If, after entering the Bios, you see such a screen, it means you have AMI BIOS:

Use the right arrow button on the keyboard to move to the Boot tab:

Go to "Hard Disk Drives" and in the line "1st Drive" (may be called "First Drive") select a disk or flash drive:

Next, go to "Boot Device Priority", go to "1st Boot Device" and select from the list what you selected in the previous tab (i.e. if you selected a flash drive in Hard Disk Drives, then you need to specify it here too. This is important! )

To boot from a CD/DVD disk, you need to select “ATAPI CD-ROM” (or simply “CDROM”) in this menu; there is no need to go to the previous “Hard Disk Drives” menu.
Now we save the results with the “F10” button or go to the BIOS “Exit” section and select “Exit Saving Changes”.
Another AMI BIOS, but everything is clear here:

Setting up Phoenix-Award Bios to boot from a flash drive
If, after entering the Bios, you see a screen like this, then you have a Phoenix-Award BIOS:

Go to the “Advanced” tab and opposite “First Boot Device” set what you need (flash drive or disk):

Save with F10 key

Setting up EFI (UEFI) Bios with a graphical interface for booting from a flash drive
Now this won’t surprise anyone. Almost all new computers are equipped with a similar shell. You can read more about it in the article.
When loading, at the bottom of the screen there is a “Boot Priority” section, where you can use the mouse (by dragging) the pictures to set the desired boot order.
You can also click the “Exit/Advanced mode” button in the upper right corner and select Advanced mode in the window that appears.

Next, go to the “Boot” tab and in the section Boot Option Priorities in the “Boot Option #1” field, set the default boot device to be a flash drive, DVD-ROM, hard drive or other available device.

How to boot from a flash drive or disk without entering BIOS
This is what I wrote about almost at the very beginning of the article.
This is when you need to press a key once and a window will appear with a boot selection. This method does not change the BIOS settings.
Usually Award BIOS prompts you to press "F9" to bring up the boot menu, and AMI asks you to press "F8". On laptops this may be the “F12” key.
In general, look at the bottom line and look for items like “Press F8 for BBS POPUP” or “Press F9 to Select Booting Device after POST”.

Why can't I boot from a flash drive into BIOS?
Possible reasons: 
On older computers there is no way to boot from USB flash drives at all. If a newer BIOS does not exist, then the project may help.
1) Download the latest version of "Plop Boot Manager" from the link above and unpack it.
2) The archive contains the following files: plpbt.img – an image for a floppy disk, and plpbt.iso – an image for a CD.
3) Write the image to disk and boot from it (or from a floppy disk).
4) A menu will appear in which we select our flash drive and boot from it.
A small explanation of disk designations when selecting:
Do not forget, after you have done what you wanted (namely, why you changed the boot in the BIOS) - return the boot settings back so that the computer boots from the hard drive.
This article will describe the most basic things regarding downloading and installing programs. The article is intended for beginners and provides some basics of computer literacy.
Information on how to select and download a file from the portal site is located in.
See also: ,
Downloading files to your computer
So, what do we need to do in order to install the necessary program on the computer? First, you need to download its installation file, after running which the program will be installed on your computer. To do this, you need to find the link to download the program and click on it.
In your browser, after clicking on the download link, the download process to your hard drive should start.
In some browsers, a dialog box may appear asking you to save the file in the specified folder, then specify the folder and remember it.
In most browsers, when downloading a file, a download line should appear at the bottom of the browser.
Example for Google Chrome. Please note we have downloaded the file MM26_RU.msi.
Now by clicking on it we can begin installing the program:
What to do if there are several links?
Even for one file we try to give 2 links:
- From software developer sites. This ensures that the files are as up-to-date as possible and that the program file is exactly as the developers intended.
- From our website. This means greater security (we scan files with antiviruses) and in many cases excellent download speeds.
There are times when there are different versions of a program for different operating systems.
In addition to the operating system version (Vista, XP, 8, 10), there is also a bitness (32 or 64-bit)
To choose the right one in this case, you need to look at what system you have.
You can easily find out by going to the computer properties.
IN Windows XP or Windows 7 this can be done by clicking on My computer(right mouse button) → Properties.
IN Windows 8/10 Pressing Start(right mouse button) → System.
File types
The files in Windows look like File name
(dot) File extension. If the extension is known to Windows, it is usually hidden and can be seen by going to the file properties.
In order to start installing the program, you need to figure out what we downloaded. Programs on the Internet are found in the form of installation files, and most likely, you downloaded the installation file.
The downloaded file may have the extension EXE, MSI
, as well as one of the archive extensions - RAR, ZIP, 7z
(and very rarely others).
First let's look at EXE
And MSI
, and then we will describe working with archives.
The downloaded file can be called anything: setup.exe,icq8_setup.exe,aimp_3.10.1074.msi. The word "setup" or "install", or their abbreviations, are often present in the name of the installation file, and are translated as "installation". However, they may not be in the title. In any case, when saving a file, you need to keep track of what it is called and where it is saved, so that you can later go to the folder and find it.
Booting a computer from a disk or flash drive into the BIOS menu is a fairly simple process that is often needed to reinstall the OS. Despite the fact that the appearance of the released BIOS versions differs from each other, the boot process itself is almost the same for all. You don’t have to perform any complicated actions; the instructions below will be understandable to the most inexperienced user.
Bios versions can even be determined visually. By pressing the computer's power button and immediately using the "Del" button (on some PCs it is worth using "F2" or "F1"), the user will immediately enter the menu. Once you enter the settings, it will be impossible to use the mouse; all changes will be made using the “Enter” key and the arrow keys on the keyboard.
After these steps, the user should see this menu, provided that he has Award Bios:


Setting up AMI Bios
The user needs to do the same steps again when turning on his PC. If the Bios settings menu looks like this, it means he owns AMI Bios.


At this point, all actions are completed, downloading from the specified disk will begin.
This version of Bios is also very popular, many users use it. The main screen looks like this:


Progress does not stand still, and motherboards are updated over time. On them, the “UEFI” interface is graphical and most understandable for the user.

There, the process of changing the device can be done with one click. The “Boot” menu will list all devices at the very top of the window. By clicking on the “Boot Option #1” tab, the user needs to drag the flash drive or disk icon there.

If this is not possible, you will need to find the “Features” block and select “Boot Options”.
If you can't access the BIOS menu
First of all, you need to make sure that everything is in order with the disk itself and that the device is working properly. The same applies to a flash drive (or other USB device).
Note! If everything is fine with the device, then it is likely that the computer is using the fast boot method. This is most relevant for Windows 10 and other modern versions.

Manufacturers of these laptops have provided an easy way to enter the menu. As soon as the user turns on the device, he will need to press the “F12” button. However, this is not at all necessary, since near the power button on almost all models there is a small button with an arrow on it.

Acer laptop
Owners of popular Acer laptops may encounter some difficulties, but not always. To enter the desired menu, pressing the “F12” key is usually enough.
But in some cases this doesn't work. When turning it on, you must press the “F2” button, thereby entering the main menu, find the line “F12 Boot Menu” and use the “Enter” key. Thus, the user will change the “Disabled” state to “Enabled” and will be able to enter the required menu using a single key.

Asus laptop
If the user has a desktop PC with an Asus board, then to enter the main settings you will need to press F8 immediately after turning on the computer.
But if you have a laptop, you need to use another key, namely “Esc”. This launch option is suitable for most models.

But if the device begins with the letter “x” and “k” (for example, Asus x610), then instead of “Esc” you will need to press “F8”.
Video - How to set boot from disk in BIOS
Similar articles
 How to open a PSD file without Photoshop How to open a PSD file other than Photoshop
 Online computer configurators with component compatibility checking
 Split Screen What is Snap Assist?
 Arranging windows in Windows using Snap What is multi-screen mode and why is it needed
 The best programs for reading and editing: we do without Photoshop
 Instructions for resetting your Windows password or what to do if you forgot your password Forgot your Microsoft account information
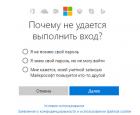 How to recover your Microsoft account password - Step-by-step examples
 Extract a page from a PDF file online
 How to unlock a found iPhone
 How to type characters and signs that are not on the keyboard