
Ways to quickly distribute Wi-Fi from a laptop and PC. How to distribute wi-fi from your phone: to a laptop, computer and other devices: detailed settings The laptop does not distribute wifi windows 7
You don't have to buy a router to have WiFi in your home. A laptop connected to an Ethernet cable can also distribute the Internet throughout an apartment. There are plenty of instructions on the Internet on how to do this on Windows 7 and older, but if you have XP, do not rush to completely reinstall the operating system.
Laptop as a router on an old OS
On any operating system from Microsoft, Internet distribution via WiFi can be organized using both built-in tools and third-party utilities. But why clutter your hard drive with unnecessary programs? On Windows XP, follow these steps step by step:
- Open “Start” and go to “My Computer”.
- In the left pane, select “Network Places”.
- Next, go to the “Show network connections” section.
- Right-click on the “Wireless Connections” shortcut and open “Properties”.

- Next, go to “Wireless Networks” - “Advanced”.
- Here, select the “Computer to Computer” option and confirm your choice.
- Click “Add” and enter the details of the network to be created (name, password, encryption method) and confirm.
- Next, open the “General” tab and highlight the IPv4 item, click on the “Properties” button.
- In this window, set the indicator to “Use the following IP...” and enter the following data:
IP - 192.168.1.1
Subnet mask - 255.255.255.0
The distribution has been created, all that remains is to enable the ability to connect to it from other devices within the range of the wireless network. To do this, return to the network connections window and right-click on the local connection and open its properties. You need to put an indicator next to the “Allow other network users...” item.

Now WiFi distribution should be fully functional.
Settings on the current OS
Similar actions can be done with Windows 7. In order for Wi-Fi to be distributed from a computer or laptop, you can, as in the previous example, step by step create a new virtual network. The only difference is in some steps.
- You need to look at the “Network and Sharing Center”.
- Run “Set up a new connection...”.

- Then go to “Setting up a wireless network “Computer-Computer” and click the “Next” button.
As you can see, the actions are similar. In the new window, enter the network name, encryption type and password. Save the changes and click “Next”. Here all that remains is to apply the “Enable sharing...” setting.

But that is not all. To be able to connect to WiFi from other devices, return to the “Network and Sharing Center” and on the left side of the window, find the line “Change advanced settings...”.

After opening this menu, make active the items highlighted in the screenshot:

Ready! But Windows 7 offers another, more advanced and simpler way to organize WiFi distribution from a computer or laptop equipped with a wireless adapter. This is using the command line. Find it in the list of all Windows programs and open it with administrator rights (right-click on the shortcut and select the appropriate item).
In the window that opens, enter a command of this type:
netsh wlan set hostednetwork mode=allow ssid=”new network name (at least 8 characters)” key=”password”
and press Enter. This is a quick way to create a distribution, and to start distributing the Internet from your laptop, use the command:
netsh wlan start hostednetwork
All that remains is to go to the “Network Control Center...” - Properties of the Local connection (the same one that is the wire through which the Internet “gets” into the apartment). Open the “Access” tab and check both boxes. WiFi distribution is now working.
(Visited 21,556 times, 1 visits today)
Currently, laptops that are more compact and almost equal in functionality are quickly displacing desktop computer users from homes and apartments. In addition to laptops and netbooks, there are usually many different devices and mobile devices in the house that have a Wi-Fi function, so most users, before buying a router, think about the pressing question: “Can a laptop distribute WiFi without a router?” It is necessary to immediately answer this that it is quite capable of Wi-Fi and, moreover, quite effectively for home use.
However, it is not enough for a user to just be able to turn a laptop into a wireless WiFi router; they also need to know how to do this. Below are detailed instructions on how to use a laptop as a source of a wireless signal, but the same instructions are quite applicable when organizing Wi-Fi distribution using a desktop computer equipped with a special adapter. Of course, there is an important condition - the PC itself must have a connection to the World Wide Web via a mobile network or wired network.
Is your PC equipped with a Wi-Fi device?
The first and most important condition for successfully completing the task is to make sure that the PC can distribute a wireless WiFi signal without using a separate router. As noted above, for this it must be equipped with a special device. To do this, you need to perform the following simple sequence of actions:
 If the user did not have a satisfactory solution to the last third condition, then how to improve a laptop or PC that is not equipped with special factory wireless adapters so that it can also receive and distribute a Wi-Fi signal? And the answer is very simple. If you don't have a Wi-Fi device, you need to install it.
For example, for desktop PCs this adapter with an external antenna looks like this:
 There are also universal devices suitable for both types of computers, made to look like a flash drive - these are the so-called “USB Wi-Fi adapters”.
How to organize distribution via the command line?
For people who don't want to install additional applications on their PC, fortunately, Windows has a tool. The action algorithm consists of the following sequential steps:

Using apps
MyPublicWiFi
This free application works perfectly in Windows 7, 8 and 10. You need to follow these steps:
- After downloading from “www.mypublicwifi.com/publicwifi/en/index.html” and installing the utility, the laptop or PC must be restarted;
- Then you must open the application with administrator rights;
- In the main menu of the utility that opens, you need to specify the network name and access code;
- Then indicate what to broadcast via Wi-Fi and click “Set up and Start Hotspot”.

Connectify Hotspot
This application is already paid, but there is also a free version on the page “www.connectify.me/hotspot”. Works in all Windows. Despite its excellent functionality, it has a couple of disadvantages, because by default it is immediately introduced into the list of automatically launched utilities when the OS boots, and also in parallel installs an application that is completely unnecessary for ordinary users, which, although harmless, sometimes bothers you and asks you to register it.
To work with it you need to do the following:

Using Windows tools
The tools in Windows XP, 7, 8 and 10 also successfully cope with the solution of the problem under consideration.
Windows XP
The following several steps are required:

Windows 7, 8 and 10
The following actions are required:
Common difficulties when creating a wireless network
Often, when organizing a Wi-Fi access point, people encounter the following difficulties:
- If a message appears about the impossibility of starting the wireless network, it is recommended to update the hardware software from the official resource of the company that issued the wireless adapter;
- If some mobile gadgets cannot connect to the created WiFi, then you need to check the settings of the anti-virus utility and firewall, which often simply block access.
Every year there are more and more owners of high-tech intellectual equipment and the question of the possibility of connecting smartphones via wifi connection to a computer increasingly arises.
This problem can be easily solved if your home Internet connection is connected through a Wi-Fi router, but situations often arise when there is no access point nearby, and the only possible solution to this problem is the ability to distribute Wi-Fi from a laptop running the Windows 7 operating system.
Setting up a wireless connection using the operating system
The big advantage of modern Microsoft systems is that there is no need to install additional third-party software to solve the problem of distributing the Internet from a laptop to Windows 7 via WiFi, since all the tools necessary for this are already built into the operating system.
You just need to perform a few simple steps, following the instructions given in the article below. To set up a connection, you first need to go to the “Network and Sharing Center” by clicking on the corresponding icon in the lower right corner of the desktop.
Network and Access Control Center
Then you should run the “Connection Setup Wizard”.
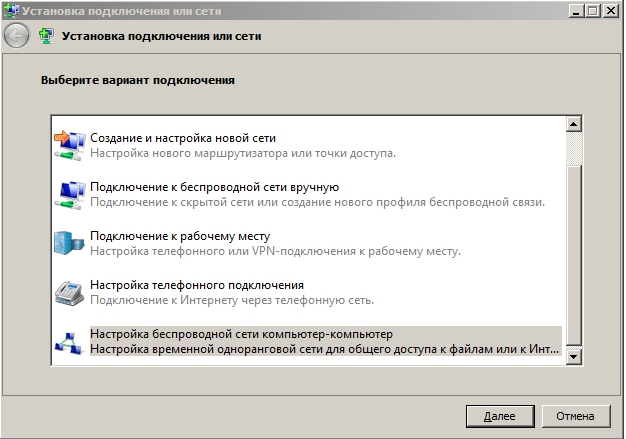
 From the proposed options, select “Set up wireless computer-to-computer networks”, after which a new window will appear in Windows in which you need to continue establishing the connection by clicking the “Next” button.
Then, in the appropriate fields in the setup wizard, it is recommended to enter the standard wireless connection parameters, where the network name - you can use any name based on your personal wishes, and select the security type “WPA2-Personal”, and come up with a complex password. After filling out all the fields, you need to save the Windows Wi-Fi connection settings and click the “Next” button again. 
If all the above steps were performed correctly, then the new wireless Wi-Fi connection should work. Before you start working on this connection, you must enable sharing by clicking the specially indicated button.
After closing the settings wizard, you need to complete the access settings settings, for which you need to go to the sharing settings section from the Network and Control Center. All buttons must be set exactly as in the photo below and click on the “Save Changes” button.
Finally, all the settings are completed and now you know how to distribute Wi-Fi from a laptop using Windows 7. 
Wifi from the command line
There are a lot of tutorials on the Internet on how to set up wifi for distribution on the Windows 7 operating system, but here we will look at setting up distribution from a laptop using the Windows command line. To start setting up Internet distribution, you should open the “Start” menu and find the “Command Line” utility in system applications, after which you need to launch the application. To create a wireless Wi-Fi network in the command line of a laptop, enter the commands: “netsh wlan set hostednetwork mode=allow ssid=komputer-info key=12345678”. “Komputer-info” is the name of the wifi distributed from a laptop on Windows 7, and “12345678” is the password for the wireless Wi-Fi connection. Once you have completed entering all commands, you must continue by pressing the “Enter” key.
 The monitor screen will display information about the new wifi network, which can be started by running the command “netsh wlan start hostednetwork”. Now that the wireless connection has been activated, there are a number of steps you should follow to configure your laptop to access the World Wide Web.
You need to go to the “Network Sharing Center”, find the desired connection through which the computer is connected to the global network, and go to the “Properties” section. In the “Access” tab, you need to check the boxes as in the picture below.

After completing all the settings, you can freely connect all the necessary devices to the wireless wifi connection created by the laptop and enjoy the expanses of the RuNet.
It is worth considering that sometimes, even with the correct wireless connection settings, devices do not gain access to the network. The reason for this may be an incorrectly selected connection, an incorrect password, and often the connection is interrupted by firewalls and antiviruses.
The publication discussed in detail options for creating new wireless connections in the case where there is no specialized wifi router, but access to RuNet is needed on all home devices. Modern Windows 7 tools allow you to solve this problem as quickly as possible, which even inexperienced computer users can do.
Many of us have access to the Internet, and most of us have more than one device in our home that can potentially connect to Internet resources. Computer, phone, tablet, laptop, organizer - all of this can be used to surf the global network. But on the same phone it is somewhat difficult and expensive to use the traffic offered by the mobile operator. But buying a router for one device, you see, is unprofitable. However, there are quite simple and convenient alternative connection options, which are discussed below.
Internet distribution via Wi-Fi without a router
Imagine that you have a laptop or computer with a Wi-Fi adapter that is connected to the Internet. And you want to make it an access point to the global network for other devices. First of all, you need to disable your antivirus firewall or Windows Firewall. If you do not do this, then distributing the Internet from your computer will not work, no matter how much you manipulate the connection settings. It is also worth remembering that in order to distribute Internet traffic, the computer or laptop must be turned on.
To disable the Windows Firewall, do the following:
- Open the control panel. In the Windows search (magnifying glass icon next to “Start”), enter control and select the “Control Panel” item in the search results.
Through Windows search, find and open “Control Panel”
- Click on the item “Windows Firewall” or “Windows Defender Firewall” depending on the version of the system you have installed.
Open the Windows Defender Firewall panel
- Click the link “Turn Windows Defender Firewall on or off.”
- Check the “Disable…” checkboxes and confirm the changes by clicking OK.
Disable the firewall and save changes
Switch the view to small or large icons.
The “Control Panel” contains operating system controls
After this, you can safely begin creating a wireless connection.
It is possible that your computer's firewall function has been taken over by the antivirus program's firewall. In this case, you will have to disable it too. Moreover, it is a firewall, and not protection against viruses and malware. Do not weaken your computer's security under any circumstances.
Via command line
One of the easiest ways to create a virtual connection is to use the command line (CL). It is very convenient because you set the connection parameters yourself and can turn the network on or off at any time.

These manipulations complete the creation and activation of the Wi-Fi virtual network. Now we have a working virtual network that we can already connect to, and we also have permission to transfer data over it. However, access to the Internet is not yet available; it needs to be opened. For this:
- Open the “Control Panel” and select the “Network and Sharing Center” item.
"Network and Sharing Center" is one of the main computer management tools
- You will see a list of networks to which you are connected. Select the one that provides your computer with access to the Internet, and click the button next to the word “Connections:”.
The Network and Sharing Center shows a list of your computer's network connections and information about each of them.
- In the window that opens, click on the “Properties” button.
Select “Properties” to configure the network connection
- Go to the “Access” or Sharing tab. Select the network you created, most likely it will be called “Wireless Connection” (Local Area Connection) with a number at the end. We check the boxes allowing users of this network to access the Internet. Confirm the changes with the OK button.
Opening access to the Internet from the selected network
- After this, your Wi-Fi network can be detected by any device within a radius of 10 meters, and you can enter it if you know the password.
There is a small disadvantage to using this method: after each reboot of the computer, the virtual network must be turned on again, which is not very convenient. But you can create a basic auxiliary interface.

As a result, we have command files for starting and stopping the virtual network, which greatly simplifies working with it.
Video: how to set up Internet distribution via Wi-Fi from a laptop using the command line
Using third party programs
Craftsmen have long been renowned for their ability to create products that are significantly more convenient than standard Microsoft processes. Distributing the Internet without a router is just one of the areas that amateur programmers have chosen. Let's take a look at some of the popular utilities they've written.
MyPublicWiFi
The MyPublicWiFi program is perhaps the most basic. The process of working with it is very simple: you launch it, click the Set up and Start Hotspot button, and the program itself creates a virtual network. You can change some data, for example, the network name or password (choose something different from the standard ones).
MyPublicWiFi automatically creates a virtual network
WIFI Hotspot Creator
Another representative of the class of programs for distributing the Internet through the creation of a virtual network is WIFI Hotspot Creator.
WIFI Hotspot Creator also creates a virtual network with the click of a button
This utility works in a similar way: with one click it creates a virtual network. The only difference from the previous program is that you need to manually select the connection that will supply Internet traffic. Then press the Start button and a Wi-Fi connection will appear, ready to use.
Programs that work on the principle of MyPublicWiFi and WIFI Hotspot Creator only create a virtual network. You need to disable the firewall and allow Internet distribution, as described in the instructions above, yourself.
Internet distribution via USB to a smartphone with Android OS
Thanks to the capabilities of Android, you can very quickly distribute the Internet to your smartphone via a USB cable. You don't need any additional software or any drivers for this. Although a little preparatory work is, of course, necessary.
- First, connect your smartphone with a USB cable to your computer, then open the settings in it, scroll down and select the “For Developers” item.
In the settings, select “For Developers”
- In the menu that opens, check the box next to “USB Debugging”. Now you can connect your phone to your computer.
Enable “USB Debugging”
- Then we return to the settings and click on the “Advanced” item. Depending on the OS version, the item may also be called “More...”. The main thing is that it is next on the list after “Data Transfer”.
Select "Advanced" or "More..."
- Check the box next to “USB Internet”. At this point, the preparatory work with the smartphone is completed, and you can proceed to the PC settings.
We create a local network with a computer by enabling the “USB Internet” function
- Open TsUSiOD. Most likely, you already have an additional local network in addition to the one you had before. Click on “Change adapter settings” (the button in the left column).
Click on the item “Change adapter settings”
- Right-click on the connection that has access to the Internet and select “Properties”.
Open the Internet connection properties
- Go to the “Access” tab, select “Local Area Connection*11” or something similar that you have created, and check the “Allow...” checkboxes. Save the changes with the OK button.
In the access settings, we allow local network access to the Internet
- Next, open the properties of the network that connects the computer and phone.
Open the properties of the local connection
- We open the same fourth Internet protocol and change the checkboxes to manual address settings.
- We enter the following data:
- IP address: 192.168.137.5 (the last cell can be filled with any number other than 1);
- subnet mask: 255.255.255.0;
- default gateway: 192.168.137.1;
- preferred DNS server: 8.8.8.8;
- alternative DNS server: 8.8.4.4.
- We check the correctness of the entered data and save the changes with the OK button.
In the window that opens, select “IP version 4 (TCP/IPv4)” and click “Properties”.
Open the settings of the protocol “IP version 4 (TCP/IPv4)”
Change the IP address from 192.168.137.1 to 192.168.0.1 and save the changes. The Internet on your phone will work after this.
Distributing the Internet to another computer via a local network
It is possible to create a local network between computers and distribute the Internet within it if one of the computers is connected to the Internet. The disadvantage of this method is that if you have two PCs, then one of them must have two network cards, and this is not always convenient. If you have cable Internet and a laptop, then it is very difficult to distribute the Internet over a local network: you will need to buy additional adapters or hubs, since a laptop always only has one network card.
Setting up a computer that distributes the Internet
When you connect two computers with a network cable, a local network will automatically be created between them. We immediately go to “Change network adapter settings”, as in the example above. In the same way, we allow access to the Internet for the newly created local network, not forgetting to first disable the firewall.

By these actions, we set the network parameters to ensure the possibility of transmitting Internet traffic packets within it.
Setting up connections on receiving computers
Receiving computers must be configured in an almost identical manner.
Now the network between the two computers is configured: all addresses match each other, and Internet traffic packets are transmitted.
Video: how to distribute the Internet over a local network
Pros and cons of distributing the Internet without a router
Each user, without the use of additional equipment, can turn his computer into a real hub and create a network of several computers through a chain of local connections. The advantages of this approach are obvious: you don’t need to spend money on extra devices, buy one or more routers, and you can simply connect computers to one another. But it also has disadvantages. You can distribute the Internet only within one network, and it’s good if it’s Wi-Fi: you can connect several devices to it at once. And if this is a local network, then you can distribute the Internet to only one computer at a time. If you distribute the Internet in a chain, then each computer must have two network cards. For the sake of uninterrupted access to the Internet from the last computer in the chain, the entire series of devices must operate in constant mode. That is, in some cases, routerless distribution can be very inconvenient to use.
At the same time, using a Wi-Fi router frees you from such inconveniences. Even the weakest routers cover a much larger distribution area than standard laptops, as well as a minimum of four cells for local connection.
When it comes to comparing transfer speeds, the slowest way to connect to the Internet is a laptop Wi-Fi hotspot. In some models, the data transfer rate of the wireless adapter does not exceed 5–25 Mbit/s. If the tariff provided by your provider provides a higher speed, then the devices connected to the virtual network will be significantly limited in traffic. In addition, the Wi-Fi network is affected by physical obstacles. Thus, devices located behind a wall at a distance of 5–6 meters may experience communication difficulties: gaps and “holes” in the transmission of information packets are possible. Therefore, this method of Internet distribution is considered the cheapest in terms of costs, but the most unreliable and unsuitable for large houses.
At the same time, access via the local network is more reliable and faster. Their disadvantage is the lack of mobility: in the case of a phone, you are limited by the length of a standard USB cable (using an extension cord will affect the speed), and with a network cable you can get confused, and in most cases it has very fragile plugs. Of course, in the case of a PC this is not a problem, but if the second device is a mobile phone or a laptop traveling throughout the house, then there will be inconvenience. Internet transmission over a local network is practically unlimited in speed: the average speed of an Ethernet cable is 100 Mbit/s, a USB cable depends on the manufacturer, the minimum is 10 Mbit/s.
Distributing the Internet from a computer to other devices is quite simple. The main thing is to follow the instructions, and then you will be able to enjoy all the delights of the Internet not on one computer, but on several devices at once.
There are times when you need to access the Internet from your phone or tablet, but, as luck would have it, there is not a single WiFi network at hand. In this case, it is not necessary to buy traffic or look for a free access point. Advanced users and IT specialists know how to distribute wifi from a laptop and computer if an adapter is installed on it. We hope these methods will help everyone else quickly start distributing wifi without a router and provide themselves with a stable connection.
Using a laptop as a WiFi access point is quite simple, and the speed provided when using this device is sufficient for comfortable browsing on the Internet. It is possible to distribute via WiFi from a laptop using:
- Built-in Windows tools.
- Third party software.
There are a lot of programs that allow you to distribute via wifi from a laptop, but not all provide a high-quality connection. However, for certain tasks this is sufficient. In turn, it is possible to distribute a signal to Windows 7,8,10 from a laptop using built-in tools in only two ways.
It is also possible to distribute wifi from a computer, but in this case a wireless adapter must be installed on it. It is installed extremely rarely in the factory assembly; most often an external device is used. This adapter resembles a radio receiver from a wireless mouse and provides a good Bluetooth and WiFi signal.
Preparing the laptop
If the laptop is connected to the network via a Lan cable and you need to distribute Wi-Fi from the laptop as a router, there is nothing complicated about it. The main thing is to create a regular connection so that the device itself has access to the Internet. You also need to check the functionality of the built-in network adapter.
It is easy to check the operation of the network cable. When it is connected to a laptop, the “Internet Access” icon appears in the lower right corner of the taskbar:
The main reason why the laptop does not distribute wifi and there is no Internet connection is a faulty cable or its insufficiently tight contact with the socket. In this case, the icon looks like this:
After connecting the cable, it's time to check the operation of the adapter. To do this, you need to go to “My Computer”. This is done as follows: open the Start menu or click on the Windows button. Next, find the “Computer” button and click on it. In the menu that opens, right-click on any free area and select the last item - “Properties”.
In the upper left corner, find the “Device Manager” section, click on it and find “Network adapters” in the list. All installed ones will be displayed in the drop-down menu. You need to find a line where NetWork is mentioned, for example:

Right-click on it (RMB), if there is an “Enable” item, activate it; if there is no such option, it means that it is already working and you can start setting up Wi-Fi.
The necessary virtual wifi access point for the laptop to simultaneously receive and distribute a signal, in this case using Windows 7 (and any other Windows will not cope), requires additional software. You can take a more trivial route and install an additional removable adapter, but below we will tell you how to get by without extra costs using special software.
Wi-Fi distribution using built-in tools
The first way to make a wifi access point on a laptop , very simple and appeared in Windows 10 systems, versions older than 1607. This all happens in a graphical menu and without using commands.
First you need to open the “Start” menu, find it in the “Settings” column on the left. Open it and launch “Network and Internet”. Among the list of suggested parameters, find and open “Mobile hotspot”. Then immediately turn it on by dragging the slider, or click on the “Change” button and enter your own password and name for the future connection. That's it, after this the point will work. The answer to the question of how to properly distribute wifi on a laptop has been found.

Distributing Wi-Fi using the command line and netsh
The second way to distribute the Internet from a laptop is to use the built-in Windows tools. They are also called Wireless Hosted Network, they are available on all versions, starting with “seven”. Following these instructions using the command line, it is also possible to distribute WiFi on a laptop.
To begin, go to the Windows menu and enter “cmd” in the lower “Find programs and files” window; in the proposed programs you can see one single entry: “cmd.exe”. Right-click on it and run as administrator. In the black window that opens, you need to copy and paste the following command: netsh wlan set hostednetwork mode=allow ssid="1111" key="11111111"keyUsage=persistent.
Where 1111 is the name of the network, and eight units are the wifi password. This data can be changed to something more familiar to the user, as long as the password consists of eight or more characters.
This is the basic command for distributing WiFi via the command line. If everything is done correctly, an entry will appear informing you that the Virtual WiFi network has been created:

All that remains is to launch a virtual network so that the laptop distributes WiFi. To do this, copy and enter another command: netsh wlan start hostednetwork. If the launch is successful, you can see that the hosted network is running.
If, after all that has been done, the Internet does not work when distributing from a laptop, you need to additionally enable the virtual adapter created by the system. Usually it starts automatically, but there are also bugs. It is used so that you can connect to the created WiFi from other laptops and from Android. To do this, go to “Device Manager”, in the “Network Adapters” section and enable the virtual adapter that appears in the list. How to turn adapters on and off was described above. Only now our adapter has a specific name - Microsoft Hosted Network Virtual Adapter.

If you decide to enable a WiFi access point on a laptop running Windows 10, you need to check whether sharing is enabled. To do this, click the PMC on the “Start” window, find “Network Connections”, click on the PMC, go to the “Properties” tab, “Access” and check both boxes in the menu so that everyone uses the connection.
Distributing Wi-Fi using programs
If difficulties arise during the creation of a Windows 7 wifi access point and the system does not work, you can look for the reason for a very long time. It's easier to use programs. They automatically connect all services, launch the virtual router manager, so the user practically does not have to do anything. Also, some programs from a laptop “create” a repeater. It turns out this way: for it to distribute WiFi, you do not need to have a computer connected via a Lan cable. You can distribute the Internet and at the same time receive it yourself via wifi from another laptop or even a phone. But, of course, not every free version of the application provides this opportunity.
Connectify
 If it is difficult to understand how to distribute Wi-Fi from a computer to a phone using an adapter as a router, then for Windows 7 there is a very simple and intuitive program - “Connectify”. You need to download the free version of the program from the official website or another source and install it, then restart your computer and start setting up a new network.
Understanding how to set up wifi distribution via a laptop running Windows 7 is quite simple. After launching the application, a program window will appear with several empty fields:
- “HotsSpotName”: here you must enter the name of the future network. It will appear when searching for WiFi from a tablet or phone.
- “Password”: create a password for the network.
- “Internet to Share”: select which Internet connection will be broadcast.
- “Share Over”: determine the method of Internet distribution. Either via a local network, if there are devices connected via a Lan cable, or WiFi. You need to choose the second method.
- “Sharing Mode”: selecting an adapter to broadcast the signal if the computer has one adapter capable of distributing WiFi. This means that at this point there will be only one of the options.
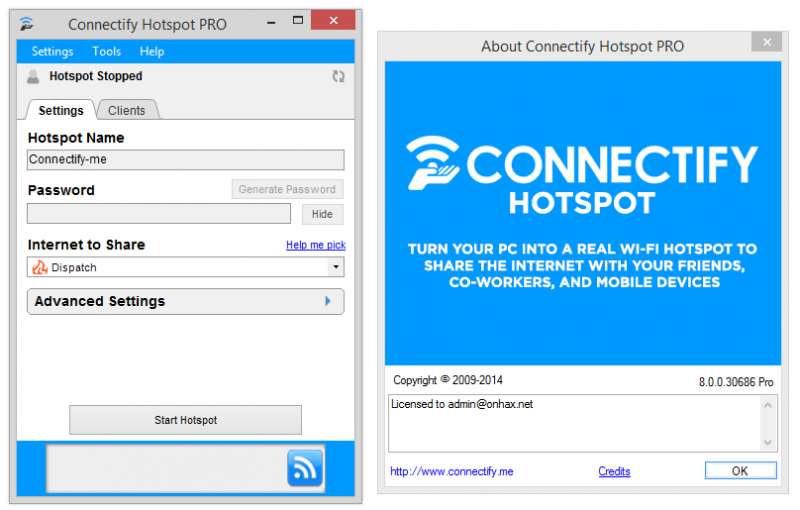
The “Connectify” program is a paid version, it sets almost all the settings itself, but using these hints, the user will configure everything independently, quickly and correctly.
This application is another way to quickly distribute wifi from a laptop. First you need to download and install the program. Next, right-click on the shortcut located on the desktop and run it as administrator.
There are very few settings here; in the first field – Network Name – you should enter the name of the future network. Network key is the future password. Enable Internet Sharing is the most interesting part of the program, since here it is possible to select both a local cable and another Wi-Fi as the initial connection. That is, this program on a computer uses it as a router and repeater.

Mypublicwifi is a free product that has powerful and convenient functionality, despite its simplicity.
MHotSpot
After downloading and installing this program, run it as an administrator in Windows and proceed to the setup stage. The standard menu is used here, as in previous programs. One difference: in the last column you can select the maximum number of users who can connect to the network. The program creates WiFi using only a Lan cable as an Internet connection, but allows you to distribute the Internet from a computer to a phone or to another laptop without problems and very quickly.
This is the easiest way to distribute WiFi from a laptop. Download the program and run it. The menu is simple: only three fields. In the first section, enter the name of the network, in the second – the password (at least eight characters) and in the last section, select the method of Internet distribution: WiFi. That’s it, click on the “Start” button and enjoy the availability of Internet connection.

Security when distributing Wi-Fi from a laptop
In addition, when creating a password in the listed programs, it is possible to select an encryption code. The most secure is WPA 2.
Problems and solutions when creating a Wi-Fi access point
When creating your own WiFi network on a laptop, problems sometimes arise. For example, a network has been created, but the phone “does not see” it. In this case, you need to restart the network adapter. To do this, find it in Device Manager, turn it off and on again. More details on how to enter the “Dispatcher” are provided in the “Preparing the laptop” section.
Also, when creating a wireless point, you need to check whether the Airplane mode is turned off; this applies to both laptops and phones. For these purposes, there is a special key on the keyboard, in the top line above the numbers, with the identification sign “airplane”.
To distribute the Internet on a laptop, you need to disable the antivirus and Windows firewall. The easiest way to do this is through “msconfig”. To do this, press Windows + R and enter “msconfig” in the line that appears. In the new “System Configuration” window, find the “Services” tab. The list includes antivirus (Kaspersky, Eset 32, Avast, etc.) and Windows Firewall. You need to uncheck the boxes next to them, save the settings and restart the laptop.
The method for distributing WiFi from a PC is no different, of course, if it is equipped with an adapter. It is recommended to first update the drivers using the Driver Booster 5 program. Now it is clear whether the laptop can distribute wifi and how to prepare it for this process.
Similar articles
 How to open a PSD file without Photoshop How to open a PSD file other than Photoshop
 Online computer configurators with component compatibility checking
 Split Screen What is Snap Assist?
 Arranging windows in Windows using Snap What is multi-screen mode and why is it needed
 The best programs for reading and editing: we do without Photoshop
 Instructions for resetting your Windows password or what to do if you forgot your password Forgot your Microsoft account information
 How to recover your Microsoft account password - Step-by-step examples
 Extract a page from a PDF file online
 How to unlock a found iPhone
 How to type characters and signs that are not on the keyboard