
Where is the ssd installed? Connect the SSD to the computer. Installation in the computer system unit
Hello admin! ? I bought a solid state drive SSD Kingston SSDNow V300, came home and opened a beautiful box, and in it only the SSD itself, no screws, no adapter bracket from 2.5 to 3.5 inch form factor to install the SSD in the hard drive bay my system unit! I called the store where I bought the solid-state drive, they said that in fact this bracket needs to be purchased separately, I had to go again, I don’t know why they didn’t tell me right away.
I secured the SSD in this bracket similar to a simple sled, but the first time it was wrong, I couldn’t connect the power cable and data cable to the SSD. The SSD solid-state drive must be secured in the sled in such a way that the power and interface connectors protrude slightly from the bracket, only then can the power cable and SATA data cable be connected to them.

In the end, I still won and installed the SSD into the system unit correctly. But after a couple of days I found out that it was possible to simply secure the SSD to the side of the system unit using ordinary vinyl clamps. In short, I thought everything was simple, but it turned out to be difficult.
But that’s not all, you will laugh, but I had to go to the computer store for the third time to buy a SATA III interface cable (up to 6 Gbps) and only then did I install an SSD drive in my system unit and transfer my Windows 7.
It would be nice to have a small instruction with pictures on your website so that users don’t ride like I did.
That's right, friends, in some cases, solid-state drives are sold without a special adapter bracket from a 2.5- to 3.5-inch form factor, then you need to buy it separately. All this must first be clarified with the seller before purchasing an SSD. If your SSD does not come with an adapter, you need to buy it separately, it costs around 150 rubles and they will sell it to you in a special bag, which will also have special screws for attaching the SSD to the bracket itself, and attaching the bracket with the SSD to the basket for hard drives of the system unit.
And in some cases, solid-state drives are sold with a special adapter bracket, for example Kingston HyperX 3K 120 GB, and HyperX 3K costs a little more, for example, the same SSDNow V300.
On many new computer cases, manufacturers have recently specifically provided space for mounting a 2.5 SSD solid-state drive. That is, no adapter is needed - a bracket from 2.5 to 3.5-inch form factor, for example, in one of the new Zalman cases there is such a cozy place on the back of the case for a solid-state drive.


So, after purchasing an SSD drive, we get this nice box.
On the box we see information about the read and write speed characteristics of our SSD and the highest speed SATA III interface (up to 6 Gb/s). A worthy manufacturer of the SandForce solid-state drive controller is also indicated.

We open the box, inside there is another box made of foamed polyethylene, it contains the drive itself

We take the SSD out of the box. The Kingston HyperX 3K SSD has a metal case with dark plastic inserts. The SSD bears the HyperX inscription indicating that it belongs to the flagship line.


And on the reverse side there is a bracket for installing an SSD in the 3.5-inch form factor of the hard drive cage of the system unit.

There are two sets of screws, the first for attaching the SSD to the 2.5 by 3.5 bracket, the second set of screws for fixing the bracket itself along with the SSD in the hard drive cage of the system unit. The screws are different sizes, do not mix anything up.

So, friends, you and I have almost everything to install our solid-state drive in the system unit, we only lack the SATA III interface cable (up to 6 Gbps), but I didn’t have to purchase that separately, since it was in the box from mine bought a year ago.

So, we attach our SSD to the 2.5 by 3.5 bracket with four screws


On a switched off computer We insert our bracket or a simple slide with our SSD solid-state drive into the hard drive cage of our system unit and secure it with four screws, two screws on each side. Please note that the basket already contains a simple SATA hard drive with the operating system, which I will transfer later to the SSD.


We remove another side cover of the system unit and secure the bracket with the SSD on the other side.

Connect the high-speed SSD SATA III solid-state drive (up to 6 Gbit/s) to the motherboard correctly, to the SATA III connector (up to 6 Gbit/s), otherwise it will not reveal all its capabilities (read our article)

And of course, the AHCI mode of hard drives must be enabled in the BIOS.


Well, we installed our SSD. If the SSD is new, then .

Friends, you can install the operating system on the SSD again, or you can. In other words, whatever you want, all the information you are interested in is on the site.
On the Internet you can find the opinion that you always need to install Windows on a solid-state drive again, but you cannot transfer a ready-made and stable operating system from a regular HDD to an SSD, since when Windows is installed on the HDD, accordingly, all its services are started for the HDD to work . But if you transfer such a system to an SSD, then many services will not only not help you work faster, but in addition will contribute to the rapid wear of the new SSD (for example, defragmentation).
I think this is not entirely correct, because the notorious defragmentation can be disabled, and I don’t want to spend several days on a clean installation of a system with hundreds of programs. And why then do the SSD manufacturers themselves release utilities for transferring the operating system from HDD to SSD, are they illiterate?
I personally have transferred finished Windows to an SSD many times, for example, on my work computer I transferred Windows 8 (I have it as a traveler) from an HDD to an SSD (60 GB capacity) two years ago, then I transferred the same Windows to another drive SSD (capacity 120GB) everything works so fast for me that I don’t need it faster.
In the future, when, of course, we will install the new operating system on the solid-state drive again.
Today we will look at:
Today, SSDs are the best choice when upgrading a PC if you want to start with a hard drive. First of all, such a replacement will significantly affect the speed of the system, and secondly, the SSD drive does not make unnecessary sounds and takes up much less space in the system unit.
Of course, for everything to work, you need to know how to properly install SSD drives on your computer or laptop. And depending on the device you are using, the SSD installation process will be different. Let's look at how to properly install an SSD drive for computers and laptops.
Connecting an SSD drive to a PC
To begin with, if you have installed an HDD on your computer before, then the process here will be similar, except that the width of the SSD is 3.5 inches instead of 2.5.
If you haven’t done this, here’s a little instruction on how to properly connect an SSD to a personal computer:

If you want to install Windows on an SSD, then this article will help you do it right. Here you will learn how to enable AHCI mode.
Connecting an SSD to a laptop

Ready. Now all that's left is to transfer to your new SSD drive.
Bottom line
That's how easy it is to replace an outdated HDD with a fast and quiet SDD without any outside help. We hope that our instructions were clear to you. Otherwise, post your questions here.
SSD drives (also called “solid state”) are no longer a curiosity for computer users. So how to connect an SSD drive to your computer once you are the proud owner of it?
SSD (Solid-State Drive), which translates roughly as “solid-state storage device”, which replaces HDD (or “hard” disks, “hard drives”) is a non-mechanical memory unit based on microcircuits. Due to much higher speeds of reading and writing data, it can significantly improve the speed performance of your personal computer or laptop.
I will say right away that installing a solid-state drive is not much different from installing an HDD (“hard drive” or “hard drive”, as they are also called). And if it is different, it represents a less demanding installation option. Why? Because SSD drives:
- unlike HDDs, they do not have a moving rotating element;
- due to their design, they do not heat up and do not make noise;
- smaller in size (2.5 inches versus standard 3.5 inches HDD);
- more durable and less capricious to mechanical damage.
 Some SSDs, along with the disk, include a special adapter panel from 2.5 to 3.5 inches (metal or plastic), which is intended for installing the disk into a standard HDD bay. There are adapters from 2.5 to 5.25 inches, in case we want to install a new disk in the slots for CD/DVD drives. In some modern computer cases, manufacturers have begun to provide special slots for SSDs. If such a slot is not provided, there is no adapter included, or all disk bays (slots) are occupied, you can place our SSD drive in any convenient place inside the system unit. You can secure the disc using, for example, simple vinyl clamps.
It is not recommended to use adhesive tapes or double-sided tapes - such fastening will not be reliable.

So,
- turn off the computer's power;
- remove the side panel of the system unit;
- We take our new SSD drive out of the box. *Note that if the disc is brought in from the cold, you need to let it warm up to room temperature. We save the packaging (just in case);
- We select a location for installing the SSD, secure it, and connect SATA cables to the motherboard. We try to use a SATA 3 6 GB/s cable, but if you have SATA 3 ports and there are no cables, then you can connect an ordinary SATA cable to the SATA ports.
The maximum performance of an SSD drive will be ensured when it is connected to a SATA 3.0 connector or higher at speeds of up to 6 GB/sec. On the board, it is usually distinguished from others by its black color and corresponding markings. If there are no symbols for SATA 3.0, you should read the documentation for the motherboard.
Then we connect power from the unit (PSU), close the system unit and start the computer.
SSD drives do not tolerate overheating well. Therefore, when installing a new SSD drive, it would be useful to take care of upgrading the cooling systems. For this, you can install, for example, a simple additional fan in the side parts of the system unit. This wind blower will perfectly cool not only our new SSD drive, but also a regular hard drive.
BIOS setup and OS installation
Before you start installing the operating system on the SSD (it is preferable to do a clean installation from scratch), we enter the BIOS (basic input/output system) of your computer. The most common way to enter the BIOS is by pressing the Delete key; the F1 and F2 keys are used somewhat less frequently.
Let's look at an example of setting up a BIOS to work with an SSD on an ASUS UEFI BIOS:
Go to the advanced system settings Advanced Mode;
We move to the Advanced/SATA Configuration settings and look at the connected devices. It is necessary that the SSD be connected to the first SATA 3, and the HDD to SATA 2;
Be sure to remember that you need to switch the SATA controller to AHCI mode;
Then we go to the Boot/Hard Drive Priorities section and install our new SSD as the first boot disk. If this is not done, the system will continue to boot from the HDD;
We save all our settings and reboot by pressing the F10 key. We make sure that the solid-state drive is listed first among the boot HDDs. To install Windows, you can leave the CD/DVD drive first in the boot. Or we use a one-time initial boot from CD/DVD via the F8 key on ASUS boards.
On many Internet resources, would-be specialists recommend copying, transferring, cloning or restoring from an image, etc., the C:\HDD drive with an already installed OS when installing an SSD. This is not recommended under any circumstances. Be prepared to install the OS from scratch after you have installed a new SSD drive on your computer. After all, when the OS is installed on the HDD, then all services are launched to work specifically on the HDD. If we transfer a system designed to work on an HDD to an SSD, then the overwhelming number of services will not only not help improve the performance of the OS and computer, but will only contribute to the rapid wear of the new SSD. In order for the SSD disk to work long-term and correctly under our operating system, we definitely need to install it “from scratch” and on a clean SSD disk.
We set the basic time and language settings and get to the selection of partitions and disks for installing the OS;
After we have seen our unallocated SSD (Disk 0), select it to install the system and click “Disk Setup”;
There is no need to format the disk. Click the “Create” button and create a partition for the entire available SSD size;
Then click “Apply”. The system requests 100 MB for its needs - we agree;
We indicate in which partition the system should be installed, in our case, on Disk 0 Partition 2, because Partition 1 is reserved by the system itself and it will not be possible to install the operating system on it;
Then we start the installation of the operating system itself.
After completing the installation of the operating system, do not forget to install all the necessary drivers that come with our motherboard - from the disk or from the manufacturer’s website.
When a new SSD drive is installed in the computer, and the system is installed on it, and we see that everything works, it’s worth thinking about optimizing the operating system to work with the flash memory drive.
Conclusion
In order for our new SSD disk to serve us as long as possible and not fail prematurely, we should adhere to certain rules when using it - to increase the service life of the disk, it is necessary to leave at least 10-15% of free space on the disk.
During the entire process of using an SSD drive, you must constantly ensure that the latest drivers for the SSD drive are installed in the system. They can usually be found on the SSD drive manufacturer's website. As a rule, with each subsequent firmware the number of drive capabilities is updated and its service life increases. In order to check the resource of our SDD disk, it is best to periodically run programs to identify disk errors and the amount of used resource - for example, software such as SSD Life.
Connecting an SSD as the main drive in many cases will significantly speed up the operation of the operating system installed on it, access to documents and main programs, and eliminate some previously necessary operations, for example, the need to regularly defragment the disk. If, of course, the machine is quite old, has a single-core processor, less than 4 GB of RAM, and the motherboard was released more than 6-8 years ago, then upgrading an ordinary computer only by installing an SSD will not give noticeable results, but it will 100% give a second life to the laptop or netbook.
Solid state drives, which are popularly called SSD drives, are gaining more and more popularity every year. Their production is becoming cheaper, more and more affordable models are appearing in the store for customers, and the number of users who decide to install them is increasing.
Installing an SSD into a desktop computer or laptop is an excellent solution if you want to increase the speed of the operating system. It doesn’t really matter how fast the solid-state drive you buy; even the slowest SSD drive is tens of times faster than a standard HDD.
Having purchased an SSD drive, it is important to install it correctly. In this article, we will look at how to install a drive in a computer or laptop.
Please note: To notice the performance improvement from installing on your computerSSD disk, you need the operating system to be located on it.
We recommend reading:How to install an SSD drive in a computer system unit
The procedure for installing an SSD drive in a desktop computer is almost identical to how to install an HDD drive, with the exception of small nuances. The main caveat is that a regular HDD for a desktop computer is 3.5 inches in size, while an SSD drive is 2.5 inches in size; therefore, to install the drive you will need a special adapter, which can be purchased inexpensively at any computer store.
Overall installation processAn SSD disk in a computer system unit looks like this:

When all the steps described above have been completed, you can proceed to setting up the SSD drive. To do this, go to the BIOS and select AHCI mode for the installed SSD drive. If you plan to use an SSD drive for the operating system, install it first in the list of disks to boot and install the operating system (or transfer Windows from the old disk to the new one).
How to install an SSD drive in a laptop
Installing an SSD in a laptop is an extremely simple procedure that takes no more than 10 minutes if done correctly. The fact is that laptops are initially equipped with 2.5-inch disks, so no additional effort is required to properly secure the disk. All you need to do to install an SSD in a laptop is:

Once the SSD drive is in place of the HDD drive, you will need to install the operating system. This can be done from a flash drive or disk.
Please note: If your laptop hasCD/A DVD drive that is not in use can be removed from the computer and replaced with a special mount forSSD drive to use it without removing the main hard drive.
I have already mentioned SSD drives more than once in my articles, saying that they are faster than regular ones and can be used to upgrade your computer. And it would seem that installing them is a trivial thing, what could be simpler, remove the old hard drive, install a new SSD , install Windows on it and rejoice, but in reality everything is not so simple. The fact is that in order to squeeze maximum speed from an SSD drive (otherwise why use it), you need to switch to AHCI (Advanced Host Controller Interface) mode in the BIOS. And this is where the surprises can begin...
So, I have an old computer that I decided to upgrade and install an SSD drive. I switched the AHCI mode in the BIOS. To do this, I went into the BIOS (press the Del or F2 button (there may be other keys depending on the motherboard model), when turning on the computer) in the "Main" menu and selected "Sata Configuration".
And in "Configure Sata as" I selected "AHCI"

I saved the settings, restarted the computer and started installing Windows. But that was not the case, an error occurred:

I started changing the BIOS settings, even updated its version
, the result was the same - this error constantly appeared. In the end, I decided to select IDE mode in the BIOS and install Windows.
The installation was successful, then I decided to try switching back to AHCI mode in the BIOS, but a similar trick failed and Windows simply did not boot (in principle, I expected a similar result). Then I decided to do this - switch back to IDE mode, go into Windows and change the mode to ACHI in the registry editor.
Having returned to IDE mode, Windows booted successfully; now you need to make changes to the registry. To do this, open the registry editor - press the key combination "Win" + "R" and enter regedit.

In the registry editor, go to the path "HKEY_LOCAL_MACHINE\System\CurrentControlSet\Services\Msahci", find the "Start" parameter, open it by double-clicking. In the "Value" field, enter "0".

That's it, the system can be rebooted and AHCI mode can be set in the BIOS. As a result, everything worked, the SSD disk worked in ACHI mode. Windows booted successfully and worked many times faster than with a regular hard disk.
So, if your old computer has stopped pleasing you with the speed of its operation, installing an SSD drive, in my opinion, is the ideal solution. But do not forget about the minimum size of RAM - 2GB and a processor, preferably 2 cores of at least 2 GHz.
I hope this article helped you avoid the mistake:
It is not possible to install Windows on this disk. Your computer's hardware may not support booting from this disk. Make sure that the controller for this drive is enabled in the computer's BIOS menu.
And it helped to upgrade your computer and increase its performance and performance.


 Rules for managing chat or how to be a moderator on a channel
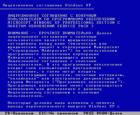 Installing windows on a computer with two or more hard drives
 “Global login problems” or “How to remove a password from a computer?
 The browser itself opens with advertising Why does Yandex browser pop up?