
Why did the electric stove break? The hob does not turn on - possible causes and solutions The control panel does not open on the computer reason
Want to know six ways to fix the problem when the Taskbar is not working on your Windows operating system? Then read on.
We all know that the Taskbar (TP) is one of the main and important components of the operating system. As one of the areas of the user interface, it is always actively used, convenient and performs useful functions for the interaction of the system with the user.
Sometimes it may stop responding to user requests. Problems such as the inability to open the Start button menu, mouse clicks on application icons that do not lead to the expected result, refusal to perform other related actions, etc., make you nervous.
If it is not working properly, you can try the following effective troubleshooting methods to get it to function as it should.
There is no one-size-fits-all solution, so you'll have to try one of all six tips one at a time until you achieve the desired result. Let's start studying them.
TASK PAN NOT WORKING

Did the instructions help you? Subscribe in the comments. It wouldn't hurt us to rate the instructions on the five-point scale below. Follow along to see the entire list of our previously published computer tips.
A huge number of owners of NVIDIA graphics cards suffer from the same problem - the inability to open the Nvidia Control Panel. This problem was noticed on all versions of the Windows operating system, from Windows 7 to Windows 10. All attempts to open the Nvidia Control Panel through the Start menu proved to be completely useless.
In this article, we will look at the problem of the inability to open the Nvidia Control Panel. We will try to update and reinstall the latest drivers for the video card from the official website. We will also try to deal with the NVIDIA Display Driver service, update the .NET Framework libraries, restart the Nvidia Control Panel process, and much more.
First of all, you should try reinstalling the Nvidia drivers. To do this, do the following:
- Click Windows+R and enter devmgmt.msc.
- Once you open Device Manager, find the “Display Adapters” drop-down tab and open it.
- Right-click on your graphics accelerator and select “Uninstall.” Confirm your intentions by checking the box next to “Remove driver programs for this device” and clicking OK.
- Then go to the official Nvidia website to download the drivers needed for your video card.
The note: We do not recommend that you select automatic driver search, as this sometimes leads to various failures, and it can also take a huge amount of time. It will be better if you use manual selection of drivers. - After downloading the driver package from Nvidia's website, run the installer to begin the driver installation process. We have already removed the drivers for the video card through Device Manager, but it will still be better if you check the “Clean installation” option during installation.
- After installing the new drivers, restart your computer and then try accessing the Nvidia Control Panel again.
The note: An alternative driver installation can be Device Manager, with the help of whose functionality you can also do this. However, under certain circumstances, various problems may arise. However, if you want to install drivers this way, then do the following:- Click Windows+R and enter devmgmt.msc.
- Once you open Device Manager, find the “Display Adapters” drop-down tab and open it.
- Right-click on your video card and select “Update Driver...”, after which Device Manager will install everything itself.
Method #2 Setting up the NVIDIA Display Driver service
The NVIDIA Display Driver service is responsible for launching the Nvidia Control Panel. Accordingly, if this software has stopped responding, then restarting the service that depends on it is a completely reasonable solution.
- Click Windows+R, enter services.msc and press Enter.
- Look for a service called "NVIDIA Display Driver Service" in the list.
- Click on it twice to go to its Properties.
- Find the Startup Type drop-down menu and click on it.
- Select the "Automatic" option.
- Then make sure the service is running. If not, then click on the “Run” button.
- Repeat the same steps for all Nvidia services that will run on your computer.
- After completing these steps, try launching Nvidia Control Panel again.
The note: Even if it indicates that Nvidia services are running, it is still better if you restart them manually. To do this, click “Stop→Run” and do this with each Nvidia service.
Method #3 Restarting the Nvidia Control Panel process
This method is quite similar to the previous one. When you launch Nvidia Control Panel, the process may start to malfunction. In this case, you just need to restart the process.
- Press the key combination Ctrl + Shift + Esc to bring up Task Manager.
- Go to the tab with open processes.
- Find the process called nviplui.exe right-click on it and select “End process”.
- Also try closing other processes that are related to Nvidia.
- Now that all processes have been closed, try opening the Nvidia Control Panel again.
If the problem was a process that was malfunctioning, then such a simple restart will help correct the situation.
Method No. 4 Setting a higher resolution
Some users on the network were able to overcome the problem with the Nvidia Control Panel not starting using a rather strange solution - setting a higher resolution. Again, some users claim that it may not launch due to the low resolution.
- Right-click on the Desktop and select “Screen Resolution”.
- Click on the Resolution drop-down menu and select the highest possible resolution for your monitor.
- Apply the resolution changes.
With the resolution set higher, try launching the Nvidia Control Panel. If it starts, then the problem should be resolved and you can set your standard resolution.
Method #5 Fixing the Windows Registry
If you were still unable to resolve the problem when launching the Nvidia Control Panel, now we will try to fix the entries in the Windows Registry. As always, be careful when changing entries. We recommend that you create a backup of your Windows Registry so that if something unexpected happens, you can quickly recover.
- Click Windows+R, enter regedit and press Enter.
- Walk the path HKEY_CLASSES_ROOT\Directory\Background\ContextMenuHandler.
- Find NvCplDesktopContext, right-click on it and select “Delete”.
- Now go to HKEY_CLASSES_ROOT\Directory\Background\shell.
- Right click on Shell and select “New→Partition” and name it Nvidia Control Panel.
- Right click on Nvidia Control Panel and select “New→Partition”. Name this section command.
- Double click on command and enter the value in the line C:\Windows\System32\nvcplui.exe, and then click OK.
- Exit the Windows Registry and restart your computer.
After making small changes to your Windows Registry, try opening the Nvidia Control Panel again. She should definitely open up calmly this time.
Method #6 Updating the .NET Framework and VC++ Redistributable
NVIDIA applications, as expected, run on software such as the .NET Framework and VC++ Redistributable. If you have outdated versions of these libraries installed on your computer, then the inability to open the Nvidia Control Panel may be an expected problem.
Try updating the .NET Framework and VC++ Redistributable by downloading from the download section of the official Microsoft website. In addition, you can also check if you have any pending updates for the operating system. Try installing them if available.
Method #7 Disabling Quick Boot
UEFI-based firmwares have a fast startup feature that helps your computer start up faster. However, this function has one drawback - because of it, some third-party applications, drivers and services simply cannot start simultaneously with the system, i.e. their launch is skipped.
If you have this feature enabled and cannot launch the Nvidia Control Panel, then the above event may have occurred. You need to go to your BIOS settings and disable Quick Boot or Quick Startup.
Found a typo? Select the text and press Ctrl + Enter
Deaf taiga store. The lumberjack foreman comes to return a batch of electric saws.“You see,” he gets excited, “the advertisement says that you can make 5 cubic meters of firewood in an hour, but none of my guys can make more than three.”
The seller puts the cord into the socket just in case.
“Oh,” the foreman shudders, “why is it buzzing like that?”
Do-it-yourself hob repair
This article will discuss the repair of touch-controlled hobs. Unfortunately, in most cases, it is not always possible to repair them yourself. However, first things first.
If you have a mechanical control, which is usually the case with dependent panels or stationary electric stoves, then due to malfunctions you can. I will divide everything else into two parts: what will work and what cannot be repaired with my own hands.
Repair of hobs. Conditionally repairable faults
The burner does not turn on or off
If the touch control works, you can change the power, turn the burner on and off, but the burner either works constantly, and it starts working as soon as you turn on the panel, or does not work, regardless of the mode that you set using the sensor, then Two types of faults can be distinguished:
- If the burner heats up immediately when you turn on the panel and does not respond to changes in modes, then it is most likely that the contacts of the relay that is responsible for this burner are stuck. Here you need to check the relay contacts. Relays usually have two pairs of contacts. One pair receives food. When power is applied, the coil draws in the core, which closes the contacts. The second pair are precisely the contacts controlled by the relay. The most likely reason is welding of the contacts. In principle, if you know how to hold a soldering iron in your hands, then you can try replacing the relay with your own hands. You need to check two things: whether the power to the relay coil is turned off and whether the relay contacts open. If power to the coil appears immediately when you turn on the panel, you will have to go to a repair shop. If power to the coil appears when you turn on the burner using the touch panel, then you need to check the control contacts. But in this case, as a rule, they are always closed. If the problem is in the relay, then replacement will be required in any case.
- If the relay is working properly, but the burner does not work, while power is supplied to the relay and the power contacts close, then how to determine whether the burner is faulty.
Half the panel doesn't work
If this is a new panel that you installed yourself, or suddenly half of the panel stopped working, or the sensor works, but the burners do not turn on, then look. In touch panels, the terminals in the block can be distributed in this way: one terminal is responsible for powering the electronics, the other two power the burners. That is, a situation where the electronics are working, the touch panel shows that the power of the burners is regulated, but the burners themselves do not work is quite possible.
The panel turns on, but the sensor does not respond to touch
There may be two repairable problems and one conditionally repairable problem.
- The sensor responds with some delay. Some manufacturers have specifically made this delay to prevent accidental pressing. That is, for the sensor to trigger, you need to put your finger in the required area and wait a little (usually up to two seconds), after which the sensors will respond quickly for some time (sometimes any sensor triggering occurs with a delay - the triggering algorithm is determined by the manufacturer).
- Perhaps there is a child lock. Read the instructions for your panel about the lock or child lock mode.
- It is possible that the glass above the touch panel or on the back side has become dirty in some way. If wiping the glass does not help, you will have to contact a service center.
You have turned off the hob, but one or more burners remain hot
Some hobs have a warming function. Usually, in this case, the display does not show 0, but the cookware icon |_| (like half zero). In this case, the burner does not turn off completely, but switches to heating mode. Water, for example, will not boil in this mode, but will remain very hot until you turn off the burner or automatic shutdown occurs, if so provided by the manufacturer.
The burner constantly turns on and off
This is most likely not a malfunction. The cooking temperature in touch hobs is adjusted by turning it on and off. The higher the power is set, the less frequently shutdowns occur and the longer the on-time period. At maximum mode, the burner operates without switching off, except in case of overheating of the burner. In this case, the temperature sensor will trigger. As soon as the burner cools down, the temperature sensor will work and the burner will turn on again.
Residual heat indicator does not turn off
The malfunction may or may not be conditionally correctable. I wrote about this malfunction. In this case, replacing the temperature sensor will help.
There may be another type of malfunction. The problem may lie in the electronics, then you will have to contact a workshop.
Repair of hobs. Fatal faults
This is where the conditionally repairable faults end, so let’s move on to faults that you are unlikely to cope with on your own. Therefore, to eliminate them you will have to contact a specialized workshop. I don’t really recommend contacting service centers. They rarely employ high-class specialists and you often overpay for some services. Therefore, it is better to contact private companies. Repairs can be much cheaper, but you need to carefully choose a company.
The sensor stopped working or began to work inadequately
As a rule, this happens with panels that are many years old. This is largely due to electrolytic capacitors, which lose their capacity over time. Theoretically, you can try replacing them. In practice, such a replacement helps only 50%. In this case, especially if the panel is more than 10 years old, it makes sense to think about buying a new one.
Other reasons
This includes all other faults that were not considered.
Summarize. Malfunctions of analog elements, that is, not electronic ones, can be considered conditionally removable. In this case, if you have the necessary skills, you can try to fix the problem yourself. If it comes to electronics, then it is unlikely that anyone will advise you on the Internet, because when it comes to electronics, it is not always possible to immediately determine the cause, even when the technician directly examines the panel. And it’s even more difficult to explain what a diode, transistor and other electronic components look like.
For this I say goodbye.
Best wishes, Me!
According to the induction principle, popular in cooking surfaces, heat is directed to the contents of the pan, rather than to the surface of the stove and utensils in which the dish is being cooked.

These devices, based on technological advances, most often break down like this:
|
The unit turns off immediately after turning on, or does not turn on at all |
|
|
Induction provides low heat |
|
|
The stove lives its own life, turning on by itself, even when there is no frying pan or kettle on the burner |
|
|
The panel doesn't work at all |
Most often, owners of induction panels are concerned about the complete failure of the stove to perform its functions: the kitchen assistant turns off after being turned on, or does not show any signs of life at all. Most often, this situation is caused by improper use of the unit. Simply, the “smart” panel recognizes the wrong one used for cooking and declares a “strike” if you decide to cook food in a saucepan from a material that is not suitable for the unit. Yes, size matters in this case too!
Advice: Do you want your induction hob to provide trouble-free operation? Use suitable pots and pans! The instructions for each product describe in detail which utensils can be used on a specific panel. Don’t neglect the advice, and you will be happy in the form of a delicious lunch!
The traditional children's riddle “it shines, but does not heat”, with the spread of induction panels received an unexpected answer: the surface and unsuitable cookware. Poor heating of the induction panel also falls under the category of errors caused by the wrong choice of cookware. The bottom of the teapots must be perfectly flat. Even millimeter-sized notches or concavities provoke a decrease in the performance of the unit.

Even more offensive, and even more dangerous, is the spontaneous switching on of the panel. Try the following in this situation:
1. Remove knives, forks, spoons, scrapers, foil - anything that contains metal from the cooking surface;
2. Wash the surface, completely removing salt deposits.
Did not help? The control unit is malfunctioning. You can’t do without a specialist here.
The complete absence of any signs of device viability has a number of reasons:
- No power at the outlet. You can check it using any electrical device, say, a coffee grinder.
- Blown fuse. To eliminate the malfunction, it is enough to replace the part.
- Broken contact in the circuit. In this case, it is advisable to contact a specialist.
Today, it is common to use electric, gas and induction hobs for cooking. Each option has its own advantages and disadvantages, as well as the nature of the malfunctions. Next, we will tell you what types of equipment breakdowns happen, the reasons for their occurrence, as well as how to repair the hob yourself.
Electrical surface
First, let's talk about how to repair an electric hob and what problems this version of the stove may have. Most often, owners are faced with a situation where the hob does not work or one of the burners does not heat up when the power is connected.
In this case, the repair comes down to the following steps:

Often, finding a breakdown of an electric hob with your own hands is not difficult if you know how to use a multimeter. If this device is not available, you can use an indicator screwdriver, which will show the presence of voltage in a certain section of the circuit.
In addition, I would like to tell you why the hob may stop working, so that you know the cause of the malfunction and how to repair each one. So, among the main breakdowns, the most common are the following:

 The first option is a defect from the manufacturer, which sometimes happens, as we were convinced of from one of the reviews on the Internet, which said that the Ariston electric hob cracked on its own and the victim was replaced with a new one under warranty. However, another explanation for the malfunction is more common - improper operation, which is described in detail in the instructions for the equipment. In the latter case, repairing the hob will be expensive and only through your fault.
How to repair equipment yourself
Induction cooker
If your induction hob is not working, there may also be several reasons for the malfunction. Here is a review of the main faults and how to repair them yourself:

Induction cooker repair instructions are provided in the video:
How to repair an induction hob
Gas stove
Well, the last option for equipment that can fail is a gas stove. If your gas hob is not working, there are not many reasons for the malfunction. Usually problems arise with the piezoelectric element and the nozzle from which the gas is supplied. 
So, for your attention, the causes of breakdowns and how to repair the hob with your own hands:

That's all the main malfunctions of a gas hob. Sometimes incorrect operation can be caused by improper installation of kitchen appliances. We recommend that you check it out with your own hands!
Complete instructions for cleaning injectors
Finally, I would like to summarize that most often an electric hob does not work due to a failed fuse or broken contact. The control unit that breaks down least often is difficult to repair yourself. We hope that now you know why this equipment breaks down and what to do to repair it yourself!
Related materials:
Similar articles
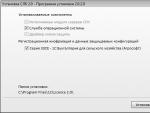 Installing a configuration licensing system (CLS) on a Linux server
 International Russian Logistics Center (IR LC) Vnukovo - how to find out the sender of a registered letter?
 How to Create a Wi-Fi Hotspot on a Windows XP Laptop
 Skype download free in Russian new version of Skype Download Skype latest version on laptop
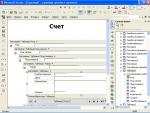 Import XML data Convert excel file to xml
 How to protect files on a USB flash drive A program for protecting a flash drive with a password
 Games that will kill your time Games to pass the time
 Manual for setting up a Zyxel Keenetic Lite router How to connect a Zyxel Keenetic lite 3 modem
 Mobile portal on MTS. MTS tariffs. MTS tariffs for Internet access
 Choosing mobile applications What a “mobile” EDMS can do