
Where are system units assembled? Online computer configurators with component compatibility checking. Connecting power to the motherboard
In addition to the fact that there are countless computer stores themselves, in addition, in the stores themselves, the choice of both ready-made computers and individual components for them is simply incredible. For an uninitiated user, it will be unclear what is responsible for what and what to choose. Often, people focus on prices, the number of gigabytes, gigahertz, cores, or simply listen to what sales managers tell them.
I, in turn, in this field, as they say, “ate the dog” and know not only what goes together with what, but also about more serious and important details, without knowledge of which one can make gross mistakes. In this post, I will briefly try to talk about some of the details of choosing system components and will give 3 examples of the configuration of gaming computers that you can order and assemble, both independently and in a store.
The first thing to consider when choosing a gaming computer is that you should never buy them ready-made! Those people who are involved in the selection of components in no way want to select the appropriate components for a gaming computer; moreover, ready-made PCs themselves, as a rule, cost much more than the computer you chose yourself, or rather its components, for subsequent assembly, and even taking into account that some stores charge money for assembly, all the same, the kit you choose will be more powerful and cheaper than ready-made analogues. Therefore, we forget about ready-made solutions and move on to the selection of components.
When choosing components for a gaming PC, you need to consider the following factors:
1) And most importantly! The performance of a computer and its individual components cannot be measured by comparison with other models based on the amount of memory in gigabytes, or based on frequencies, number of cores, etc. Real performance is measured in terms of specific programs, in real tests that are carried out on popular, authoritative publications dedicated to computers and components. You can easily find information on individual components by typing a query into Google, such as “Intel i5-4590k review”, or for example "GTX980Ti review". In order to verify the veracity of the information, go to 3-4 different reviews at once and check the information; if it roughly matches everywhere, then everything is correct.
2) Intel processors almost always turn out to be more powerful than AMD processors in games, and it doesn’t matter at all that the same Intel i3 has only 2 physical cores, and the same AMD FX-8300 has as many as 8, and even more so frequency But the point is that Intel processors have dramatically higher performance per core and this performance gives them an advantage over AMD processors in games, because games are rather reluctant to optimize for multi-threading (multi-core). Therefore, when choosing a processor, you need to focus on real tests in real games, and not on synthetic tests such as SuperPi. The most optimal processor for games is almost any intel i5 with a frequency above 3.2 GHz, and if you need more performance, then pay attention to processors with the letter “K” at the end, such processors can be overclocked, which adds performance and sometimes very much ! Also, it is worth maintaining a balance between the processor and the video card, it is completely useless to install an intel i5 in combination with, say, a GTX750Ti, but also, it would be too illogical to install an i3 and a GTX980Ti, it will not be enough. It should be remembered that the processor should not cost more than the video card!
3) A video card is the main component of a gaming computer; a gaming computer needs to be built on the basis of this component, and the power of a video card is not measured in gigabytes, or simply in megahertz; in fact, there is no power measurement at all. There are individual indicators, such as the amount of memory, which is not so important if you have over 3 gigabytes on a video card from 15,000 rubles, or from 2 gigabytes on cheaper cards, or the frequency of the graphics processor, which may vary between different models, the same product (the same chip model, say GTX970, can be produced by a dozen companies and each video card will be different), etc. Also, it is worth considering that there are reference and non-reference designs, what does this mean? Reference design is the standard design provided by the manufacturer for this video card model; reference design video cards heat up and make more noise, so purchasing them is not recommended. Video cards of non-reference design heat up less and make less noise, since they have a better cooling system, with several large and quiet fans, and sometimes have a different component base, which allows them to be overclocked more efficiently, so I recommend purchasing video cards just not reference design.
4) Volume and frequency of RAM - in fact, the amount of RAM for games is only 8 gigabytes, in fact you don’t need more, and frequencies don’t play a special role, so the best choice is 2 memory sticks of 4 gigabytes each with a frequency of 1600 MHz, preferably Samsung Original, or HYNIX Original. Planks without the word "Original" are fakes on these chips and are of worse quality.
5) Hard drive and SSD - for most games you only need an acceptable hard drive, for example Western Digital Black, and there will be no positive reaction from installing an SSD in games, but installing the same SSD allows the system itself to work much faster and speeds up the loading of games .
6) Motherboards - the biggest misconception is that expensive, cool motherboards give an increase in performance. This, alas, is not so! The motherboard is the link between the processor, memory, video card and other system components; in fact, the motherboard is the wires between the system components. But it’s also worth considering that motherboards may have functions that are important to you and you should choose a motherboard based on your needs. When choosing a motherboard, in addition to the obvious things, such as choosing a socket (processor connector) and checking compatibility with the selected processor, you need to look at the number of connectors you need - SATA for hard drives and drives, USB 2.0 and 3.0, etc. However, look at the availability of functions such as SLI, Crossfire, which allow you to install several video cards at the same time, but if you do not need such a function now, then it is better to refuse to buy such motherboards; you are overpaying huge sums for these functions. The best option is a motherboard costing 4-5 thousand rubles, ATX form factor with an 8-pin processor power connector and 4 connectors for memory modules, as well as 5-6 connectors for connecting audio devices.
7) Power Supplies - The biggest misconception about power supplies is that the more watts the better. Nothing like this! There will be no difference between a 65 and 1500 watt power supply for your system, if it is built on one processor and one video card. The power supply must be selected based on the system consumption. The most powerful video card cannot consume more than 350 watts, the processor, no more than 250 (rare copies, overclocked, without overclocking, powerful CPUs consume about 80-100 watts), everything else consumes about 70 watts. Therefore, for systems around 30,000 rubles, 500-550 watts is enough, for powerful PCs, with one video card, “for overclocking”, 650 watts, and for the rest, it depends on the number of video cards, but the rule is simple - +1 video card = +300 watts.
8) Do not forget about cooling systems; if the processor is overclocked, then you need to select a processor “cooler” based on tests, the most optimal option, for example Coolermaster S200. If the same processor does not race, then you can choose a simpler cooler, up to 500 rubles, based on reviews on the same Yandex market.
This is how the components are selected, and now I will give 3 examples of decent assemblies with a certain price category, these assemblies are intended only for games and do not meet certain requirements, but this does not mean that you cannot, say, do work on them, or rendering / audio processing. Also keep in mind that theoretically it is possible to select even more optimal components, but for this you need to look at the stores and the availability of certain components in them; these components were selected in one store, which delivers goods throughout Russia and has its representative offices in many cities. (prices are taken from one popular store, its name cannot be indicated according to the chip rules).
And so here are 3 configurations from me:
The configurations themselves with links to the store:
30.000R:
Processor (CPU) - AMD Athlon X4 860K Black Edition, OEM 4170r
CPU cooler - Cooler Master S200
Motherboard - ASUS A88XM-A 3340r
RAM - DIMM DDR3 1600Mhz 8GB Hynix Original 3750r
Video card - MSI R9 270 GAMING 2G, R9 270, 2048MB, GDDR5, Retail 9430r
Case - InWin IW-EAR007 500W4290r
Result - 30300 rub.
This configuration has a price of around 30,000 rubles and is intended to replace game consoles; on it you can play all modern and planned games at settings close to high. If you have the money, then it’s worth replacing the motherboard with an AM3+ with an AMD970 chipset, for example from MSI, and replacing the processor with an AMD FX-8300, it will cost about 3-3.5 thousand rubles, but it will be worth it.
55.000RUR, timecode on video 15:55:
Processor (CPU) - Intel Core i5-4590, OEM 13860r
CPU cooler - Cooler Master CP6-9HDSA-0L-GP 530r
Motherboard - ASUS B85M-G 3640r
Hard drive - 1TB, Seagate SV 35.5, ST1000VX000 3750rub
Video card - Palit PA-GTX970 JetStream 4G, GTX 970, 4096MB, GDDR5, Retail 22170rub
Case - InWin IW-EAR007 4290rub
Result - 52310 rub.
This system unit is designed for high and ultra settings in all modern games, like the previous system unit, it has exactly the same case, with a built-in 500-watt power supply, mATX motherboard, and the same 1TB hard drive. But this configuration is not intended for overclocking, at least the processor, and the power of the video card and processor allows you to play all games comfortably.
80.000R:
Processor (CPU) - Intel Core i5-4690K, OEM 16620r
CPU cooler - Cooler Master S200 940r
Motherboard - MSI Z97S SLI KRAIT EDITION 7520r
RAM - DIMM DDR3, 8GB (2x4GB), Kingston HyperX FURY blue, HX316C10FK2/8 3970rub
SSD - SSD 128GB, Plextor M6S, PX-128M6S 4500r
Hard drive - 1TB, Seagate SV 35.5, ST1000VX000 3750rub
Video card - MSI GTX 980 GAMING 4G, GTX 980, 4096MB, GDDR5, Retail 33450rub
Case - Corsair Carbide Series SPEC-01, CC-9011050-WW 3790r
Power supply - ATX Corsair CX 750, CP-9020015-EU, 750W 5930r
Result - 80470rub
This system unit is at the cutting edge of technology. A motherboard with SLI support, an overclockable processor, a power supply and a case are designed to accommodate two video cards, and the existing video card is pre-top and provides consistently high FPS in all games. This configuration is intended for a narrow circle of people who crave high FPS and juicy pictures.
Of course, not everything is selected ideally, but ideal selection can only be made for a specific person and his tasks.
That's all, I hope you found it interesting to read this ton of text and it will be useful to you. And remember - under no circumstances buy ready-made computers, they cost you more and work much worse. In the modern world, there are stores that will assemble and help you select components for the system!
- Build for games medium budget processor → six-core i5-8400, i5-9400F, Ryzen 5 2600. The AMD option is more suitable for game streaming.
- Build for games, medium budget video card → for FHD GTX1660, GTX1660Ti, RTX 2060 will deliver 2K (1440p). For budget builds, we can recommend a video card from AMD RX 570 8GB, but the RX 580 and RX 590 are not profitable to buy compared to the fresh GTX1660.
- Pre-top assembly processor → i7-8700, i7-8700K, i7-9700K, Ryzen 5 2600X, Ryzen 7 2700. Eighth-generation coffee machines with hyperthreading are better than their refreshes and are cheaper. The i7-9700K can be recommended exclusively for gaming builds. Ryzens are better at multi-threaded tasks.
- Pre-top assembly video card → for 2K QHD RTX 2070, AMD RX Vega 64. Video cards from NVIDIA are more energy efficient and generally faster, so it makes sense to look at Vega only if there is a big discount on these video cards.
- Top build processor → i9-9900K, i7-8700K, i7-9700K, Ryzen 5 2700X. In the top gaming builds, it makes sense to buy an eight-core, sixteen-thread i9-9900K processor.
- Top video card assembly → RTX 2080 Ti, RTX 2080, . For 4K UHD gaming, the only choice is the Nvidia RTX 2080 Ti video card.
Which computer to choose in 2018?
Due to the current difficult situation with the video card market and exorbitantly high prices, there is no need to talk about buying a budget computer in 2018. Players can be advised to switch to consoles - for example, the PlayStation 4 Pro/1TB now costs the same as an average GTX 1060 video card.
The rest of the pack boyars have to moderate their graphic appetites and choose a video card at a lower level. We wanted to take the GTX 1080, now, God willing, we can scrape together a GTX 1070. Thanks to the gentlemen miners and a small cartel of video card manufacturers, who in turn blame the RAM manufacturers, allegedly the latter are exorbitantly inflating the prices of their products and, on top of everything else, disrupting the supply of GDDR5 chips so necessary for the production of video cards.
So, what can you use to build the best computer in 2018? Which processor and motherboard to choose for it, how to choose a video card and optimal RAM - read below!
Top computer (enthusiast), budget from 100 thousand rubles
Gaming computer
We give preference to the latest generation Intel Coffee Lake processors. The most expensive in the coffee line is the i7 8700K. The processor will be compatible with a motherboard based on an older Z370 chipset. The Z370 will allow you to overclock the processor and increase the frequency of the RAM if the stock performance is not enough.
16 gigabytes of memory is enough for a gaming PC. It is advisable to buy a 2x8 GB kit kit for memory operation in dual-channel mode. The performance of the system as a whole directly depends on the frequency of the RAM, so it is advisable to select DDR4 sticks with a rating of ~2666-3000 MHz. Also pay attention to timings. Low latency CL14/15 memory costs more than standard CL16. By the way, the benefit from low timings is more noticeable on Intel processors; on AMD Ryzen, the high operating frequency of RAM will greatly benefit.
The main thing in a powerful gaming computer is, of course, the video card. The top Nvidia GTX 1080 Ti models are best suited for gaming builds. However, video cards are now indecently expensive even for wealthy gamers. Therefore, we can advise you to pay attention to video cards of the GTX 1070 Ti, RX Vega 56/64 level. Wealthy gentlemen choose monsters like Titan V, although buying the latter is more difficult than buying an iPhone X on the day sales start. According to the latest inside information, you shouldn’t expect a price reduction with the release of the 2000th series of Gifors, unless of course you are ready to wait forever. For comfortable gaming in 4K, one 1080 Ti with ultra graphics settings will not be enough; if finances allow, purchase two GTX 1080 Ti video cards.
Installing an SSD drive will help reduce the boot time of the system and games. For optimal performance, it is worth investing in two disks - allocate one disk for the operating system with a page file, and install games and applications on the second.
Hard drives are selected based on needs. Currently, models up to 14 TB are available on the market. If you do not work with huge amounts of information, you can completely do without classic HDDs. However, remember that in the event of a failure, it will be quite difficult, and most likely impossible, to recover information from a solid-state drive. So regularly backup important data to an external HDD.
Computer for work
For work tasks (programming, rendering, editing, modeling, photo processing, etc.), both the presence of fast cores and their number are important.
We recommend paying attention to the top-end Ryzen 7 1700 on the AM4 platform, as the most budget eight-core processor. The Ryzen 7 desktop uses the AM4 platform, so you can easily upgrade your existing computer that uses an AMD Ryzen processor. By the way, AMD will support the AM4 socket for another 2-3 years, so you won’t have any problems with a future upgrade.
For serious guys, the Intel LGA2066 platform is suitable, with a wide range of processors - from the ultra eight-core top i9-7980XE to more affordable eight-core processors, such as the i7-7820x. Quite expensive motherboards based on the X299 chipset are suitable for Skylake-X processors. The chipset supports four-channel memory and has a large number of free PCIe lanes, which allows you to connect several fast devices (video cards, nvma drives).
It is also worth considering assembling high-performance systems based on AMD Ryzen-ThreadRipper processors. There are only three processors available in this line: the eight-core 1900x, the twelve-core 1920x and the older ripper 1950x equipped with sixteen cores. Threadrippers require a motherboard with TR4 socket on the X399 chipset. The characteristics are similar to the X299 platform from Intel, but AMD costs a third less. The only drawback is the non-standard mountings for the cooling system and the small range of TR4 motherboards.
Pretop computer, budget 80 - 90 thousand rubles
An excellent computer for work and play. On this system you can equally comfortably play a popular game or render a project in Premiere or Blender. Note that Intel processors are more suitable for building gaming systems, and eight-core Ryzen for workstations.
Medium - mainstream computer, budget 60 - 70 thousand rubles
The optimal computer for gaming in FHD 1080p resolution, also perfect for office programs. The recommended video card is nvidia GTX 1060 in the version with 6 GB of memory. The price tag for the RX 580 is now too high.
In this category, Intel fans have some problems - in particular, Intel has not yet released budget motherboards on the 1151v2 socket (B360, H370, H310 chipsets), so you will have to buy an expensive motherboard on the Z370 chipset. AMD does not have such problems - for the popular Ryzen 5 1600 processor, you can choose any board on the AM4 socket (A320, B350, X370). The mid-budget motherboard based on the B350 has overclocking functions and has everything needed to build a high-performance computer, while the price tag for such boards is half that of the similar Z370 from Intel.
Budget option 35 - 40 thousand rubles
RAM: 8-16 GB 2400-2666 MHz
For a gaming system without a video card, we recommend the AMD Ryzen 5 2400G with a built-in Vega video core, which provides GT1030/RX550-level performance. The computing power of the R5-2400G processor is comparable to the R5-1500X, which makes it possible to upgrade in the future - you just need to buy a powerful video card without changing the processor. It is worth noting that the Ryzen 5 2400G out of the box is guaranteed to work with memory with a frequency of 2933 MHz (instead of 2400 MHz for desktop Ryzens).
Ultra-budget builds up to 20 thousand rubles
Such assemblies are suitable for mining farms or media centers.
Take the cheapest processor, for example Celeron G3930, equipped with a built-in Intel UHD 610 video core. This budget processor is capable of playing online video with 4K resolution.
For a media center, 4 GB of DDR4 RAM is sufficient. Any frequency will do, starting from the standard for DDR4 2133 MHz. We recommend taking the cheapest “green” dies from Samsung; this RAM is quite reliable and also overclocks well.
A discrete video card is not considered in the ultra-budget segment.
Popular builds - good PCs 2018
So, you have a desire to build a computer that fully satisfies your personal requirements, you have a certain amount of money to buy components, but... it all ends with your desire, you are not sure what and how to do next.
If no questions arise with this, and the components have already been purchased, then you can immediately start reading the article
STEP 1: What kind of computer do you need?
To build a computer from scratch yourself, first you need to decide what the future computer will be used for. Let me make a reservation right away that for ease of understanding, here and further we will use the following concepts:
Office computer– a simple low-power computer, designed primarily for working with office applications, not designed for powerful computer games.
Gaming computer– a powerful computer for processing graphics or running heavy games, for working with heavy programs.
What exactly should your computer be like? Maybe it will be a gaming PC. Or maybe you need a computer for working with office applications, for typing, and you do not plan to process heavy graphics on it. This stage is one of the most important stages, because It is now that the approximate future configuration is being determined, and most importantly, how much money will have to be spent on assembling your future computer. For example, it makes no sense to spend a lot of money on assembling a top-end monster on which you only plan to work with text, and vice versa, assembling a simple computer for games will most likely greatly disappoint you.
STAGE 2:AMD orINTEL?
So, you have decided what kind of computer you need. Now the time has come to decide on the future platform on which the computer will be built. It will be either Intel or AMD - the final price of the computer depends on the choice of platform, as well as which processor will be used in the future computer.
I won’t dare to say which is better, AMD or Intel; there have been fierce debates on this topic on the Internet for a long time. Each platform has its own advantages and disadvantages, but if we characterize them in general terms, we can say that the AMD platform produces cheaper computers with approximately the same power as the Intel platform. If you want to save money, or are limited on a budget, then I recommend taking a closer look at AMD, as a result you will get a pretty good computer for less money. Intel is better suited for gaming systems, Intel processors generally show better performance in games. If you're not building a computer for gaming, then AMD is probably the best choice.
STEP 3: Where is the most convenient place to select components?
The easiest way to select components for your computer is to use the price lists of stores in your city. I use the websites of large stores, which have information about the availability of components, prices, and reviews.
You can, of course, order everything through online stores, but personally I don’t find this method convenient. Ultimately, it's up to you how and where you buy your components.
STEP 4: Select the central processing unit (CPU)
So, we open the website of a computer store, or look at the price list and look for a processor for our future computer. You should not buy the cheapest processor if you plan to build a powerful computer. We pay attention to the processor clock speed, number of cores, cache levels. You can look for reviews about any processor that interests you.
More processors in the store are marked as OEM or BOX/cooler, be sure to pay attention to this! OEM processors do not come with a CPU cooler, while BOX versions come with a simple cooler. For gaming systems, this is not the best option, since the standard cooler often does not cope with the task, so it is best to look for the OEM version, and then separately purchase a good processor cooler for it. The BOX version is also suitable for an office or work computer. Remember that you will pay more money for the BOX version of the processor, because... the overpayment is for the cooler included.
In general, choosing a processor is a very important undertaking, and this is a rather large separate topic, which I will cover in future articles.
Once you have decided on the processor, remember its name socket as well as its thermal package (in watts) is very important information, it will be useful to you in the future when choosing a motherboard and cooling for the CPU.
STEP 5: Selecting the motherboard

The choice of motherboard is carried out taking into account which processor you selected in the previous step. Namely, what socket your processor runs on. Simply put, you can now select only those motherboards that have the exact same socket as the processor you choose. If the sockets of the processor and motherboard are different, you will not be able to install the processor on the motherboard.
When choosing a motherboard, focus on the following characteristics:
- board form factor (ATX, microATX);
- RAM type (DDRx, where x is DDR version) and maximum supported frequency;
- number of SATA ports and their speed;
- version of USB interfaces;
The first two characteristics are very important - they determine what kind of case for the system unit you will need, and what kind of RAM you can install, so remember them.
Another important point is the presence of an integrated graphics processor. For example, if you have it, you can save on buying a video card if you are assembling a regular office computer.
Advice:On the motherboard manufacturer's website you can find a list of supported, tested compatible processors and RAM models.
STEP 6: Select RAM
 Selecting RAM is not that difficult. The main thing to remember is that it must be exactly the same type that the motherboard you choose supports. For example, it will not be possible to install DDR2 memory into a motherboard slot designed for DDR3 memory.
Ideally, you should choose memory with the maximum frequency supported by the motherboard. Supported memory frequencies must be found in the motherboard description.
Now about the main thing - the amount of memory. For a simple office computer, which will not have any special performance requirements, the simplest memory with a minimum capacity of 1-4 gigabytes is sufficient. Your gaming computer should have 8 GB or more memory installed.
Advice: If you are going to install more than one stick of RAM, then I strongly recommend buying memory in sets. The set usually comes with 2 or 4 strips. This will allow you to avoid many troubles associated with computer operation in the future.
STEP 7: selecting cooling for the CPU
 Cooling for the central processor can be with a universal mount, or maybe with a specialized one for a specific socket. When choosing cooling, look at the supported sockets (the socket of the processor you choose should be there), as well as the power dissipation in watts - it should be equal to or higher than the thermal package (TDP) of the processor. If the CPU heatsink is weak, it may cause it to overheat.
For gaming systems with a powerful processor, it makes sense to buy good cooling, the power dissipation of which significantly exceeds the TDP of the processor.
Also pay attention to the height of the cooler if you want to install a tower-type cooler. If it is too high, this will need to be taken into account when choosing a computer case.
STEP 8: Graphics Card
 If you are assembling a gaming computer, then this is as important a step for you as choosing a processor. If this is a simple office computer for which graphics performance is not important, then you can do without purchasing a video card at all. Many motherboards have an integrated graphics processor, and the monitor can be connected directly to the motherboard. If the board does not have a monitor output, then you can either look for a motherboard with integrated graphics, or buy a simple video card.
The situation is completely different if you are building a powerful computer for graphics processing or gaming - you simply cannot do without buying a good gaming video card.
First you need to decide on the base manufacturer of the video card. There are two of them - NVidia and AMD. AMD is as always - cheap and cheerful, for less money you get approximately the same (and sometimes higher) performance as a similar NVidia video card. However, AMD lacks technologies such as PhysX, CUDA, and other interesting things that only NVidia video cards have.
I consider it pointless to argue about which video card manufacturer is better; you yourself can search the Internet for reviews about certain video cards and make your own difficult choice.
When choosing a video card, do not only go for video cards with a large amount of memory. Pay attention to the memory bus bandwidth, this is a fairly important parameter - the higher it is, the better.
Once you have made your choice, remember the length of the video card; this may come in handy later when we select the system unit case. Otherwise, it may happen that the video card you choose simply will not fit into the case.
STEP 9: Hard Drives
 The main parameters of a hard drive are speed and capacity. The loading speed of the operating system and all other programs depends on the reading speed. In the vast majority of computers, the biggest bottleneck affecting boot speed is the hard drive. Therefore, if the speed of loading the system and programs is critical for you, take a closer look at solid state drives - SSD drives. Unlike classic hard drives, they have no mechanical elements - these drives are like a large ultra-high-speed “flash drive” with a SATA interface.
Due to the high cost of SSD drives, they often resort to using at least two drives simultaneously - an SSD and a classic HDD. You can install the operating system and programs on the SSD, and use the HDD to store your files.
Personally, I recommend using an SSD on any computer if your budget allows. As practice shows, even old laptops from 5-7 years ago with an SSD installed instead of an HDD seem to gain a second life and work much faster, not to mention new computers. The SSD has virtually no effect on performance in games, but it has a fantastic effect on the response speed of the system and all programs. J For example, on a fairly powerful computer with an SSD installed, the Windows 7 operating system, including a bunch of startup programs and plus Kaspersky antivirus, is completely loaded in 7-9 seconds!
But SSDs also have one drawback: once you get used to the speed of work on an SSD, you will no longer be able to calmly work on any other computer with a regular HDD; it will seem too slow to you. J
STAGE10: CD/DVD-ROM

Everything is simple here - if you plan to use laser discs (CD, DVD, Blu-ray, etc.), then you definitely need a disk drive. Personally, I haven’t used it for a long time, since you can install the operating system from a flash drive, and all the necessary drivers are on the Internet.
In general, of course, it is better to install a CD-ROM, especially if you have no experience in assembling and configuring computers. The discs that come with the components will help you out a lot at first.
When choosing a CD-rom, you should pay attention to the supported disc formats.
STEP 11: select the system case
 It’s quite easy to choose a case - choose the one you like best. The main thing is to consider which components you chose in the previous stages. Pay special attention to what size motherboard you have. For example, if it is ATX size, then the case must support installing an ATX board. Additionally, do not forget that if you choose a tower cooler for the processor, it may not fit in a small case - carefully look at its dimensions. Also pay attention to the dimensions of the video card so that it can be installed in the case without any problems.
Cases come with or without a pre-installed power supply. If for an office computer the option with a pre-installed unit is still suitable, then for a gaming computer be sure to choose a case without a power supply, it can then be calculated and purchased separately.
STEP 12: calculating the power supply

The power supply is one of the most important parts of the computer; it determines how all other components of the system will work, how protected they will be from voltage surges and other misfortunes of electrical networks. What you definitely shouldn’t do is try to save money on a cheap power supply, no matter what kind of computer you build.
Pay attention to power supplies with energy efficiency labels 80plus, they come in five types: bronze, silver, gold, platinum and titanium. If the block is at least marked with the 80plus label, then this is already good.
Those labeled titanium are, accordingly, generally the best power supplies; they provide up to 95% efficiency. And this, in turn, speaks about the quality of manufacturing of the power supply - such a unit consumes less energy than other similar units with lower efficiency.
Look at what connectors the power supply has, they should be enough to connect all devices. Be sure to pay attention to the power supply diagram of the motherboard and processor! If the motherboard, for example, has a 24 pin power supply, then the unit must have a 24 pin power output (or 20+4 pin, this is the same). The same goes for processor power. Also pay attention to whether there is an additional power connector on the video card and whether there are the necessary connectors on the power supply.
The power supply must provide power higher than that consumed by all the computer hardware at peak load. Otherwise, at best, the computer will simply turn off. In the worst case, it’s better for you not to know what will happen, just take my word for it.
STAGE 13: additional and very necessary little things + peripherals
You may also need:
- fans for air ventilation inside the case;
- thermal paste
- cables, cables, adapters;
- periphery
Fans must be purchased if the case you choose does not have them. Choose the largest fans that your chassis can support. The larger the fan, the more air it will be able to move, while making less noise than its smaller counterparts.
Thermal paste will be needed to install the cooler on the processor. Typically, a boxed processor comes with thermal paste, but as practice shows, it is better to buy high-quality thermal paste and use it.
You will also need SATA cables to connect hard drives and CD-ROMs. Motherboards often come with several SATA cables, so keep this in mind.
I did not move the periphery into a separate stage. The choice of periphery is a purely individual matter. You can choose a keyboard, mouse and monitor without my help
STEP 14: Check
The final stage of choosing components is a mental check to see if you have chosen everything you need correctly? Check again all components in size so that they can be installed in the case without problems, check that there are enough slots on the motherboard for all components, whether you have enough wires on the power supply and whether there are all additional wires for connecting disks and CDs. ROM, for example, SATA cables. Despite its apparent simplicity, do not ignore this stage. It’s better to check everything again now than to later try to exchange the wrong part you bought for the one you actually need.
If someone doesn’t understand something, welcome to the comments.
The first step is to determine exactly the tasks for which your future system unit will be used. If you plan to purchase gaming equipment, then special attention should be paid to the video card, and for a graphics workstation, the processor power and the amount of RAM play a fundamental role. The least demanding in terms of performance are office systems. You don't even need to add an external video card, because the built-in one will be enough. First you need to select a processor. This element affects the overall performance of the entire system, and the more cores there are (and the higher their operating frequency), the faster operations will be performed.
Next, the PC configurator will help you select a motherboard. It must be compatible with the CPU and support RAM of the required frequency. Pay attention to the presence of all the necessary slots and connectors, as well as the size of the motherboard itself (ATX, micro ATX, mini ATX, etc.). Usually, any of them already has a built-in network and sound card. The online store website builder will automatically select suitable options after you select a processor, and will exclude those that are not suitable. A gaming computer must be equipped with an external video card. If you want to regularly play modern games and forget about upgrading your system for a long time, then you shouldn’t save. This also applies to the amount of RAM; it will not particularly affect the cost of the PC, but will significantly affect performance. The volume of the hard drive determines the amount of information that you can simultaneously store on your computer. But to increase system performance, it is recommended to additionally install an SSD drive. It will contain the OS, programs and applications.
For convenient work with external storage media, the system unit is optionally equipped with an optical drive and a card reader. One of the important elements of the system unit is the power supply. Its power should be selected after calculating the total amount of electricity consumption by the components. In addition, leave a reserve of 100-200 W for reliable operation under increased loads on the processor and video card. The designer will not let you make a mistake when choosing a power supply, as he will take into account the components you have chosen and will provide only suitable cases with power supplies.
The configuration of a powerful gaming computer includes an additional cooling system, which is selected automatically, depending on the selected processor. All that remains is to assemble everything into the case. It can be very simple and straightforward if you plan to install the system unit under the table, where no one will see it, or it can have neon lighting and a window on the side that allows you to observe the operation of the system (gaming options). This is a matter of taste, but keep in mind that the case for a gaming PC should be spacious and have good ventilation so that the components do not overheat at peak loads.
Having difficulties?
For the convenience of clients, it is possible to send the resulting configuration for printing. And if difficulties arise, then you should use the help of our engineer, who will tell you which components are best to use to obtain optimal technical characteristics.
By deciding to build a computer with us, you get the best prices and service. We guarantee fast but careful delivery of your system unit.
- 1. System unit - how to choose components?
- 2. Installation of the processor, RAM and cooling system.
- 3. Applying thermal paste to the processor
- 4. Installing the motherboard into the case
- 5. Connecting the case controls to the motherboard
- 6. Installing the power supply
- 7. Installation of drives
- 8. Installing a video card
- 9. Laying cables and completing work
Each of us has at least once encountered a situation where, having trusted a sales consultant, we chose a ready-made personal computer, and after a few months we realized that for the same money we could have purchased a much more productive option. To ensure that a similar story does not happen to any of our readers in the future, we have prepared instructions on how to assemble a computer yourself.
This process actually turns out to be much simpler than many non-technical users assume, but it still has a number of nuances, which we want to dwell on in detail in our material. We’ll start with a brief reminder of what a computer consists of and how not to make a mistake in choosing components.
System unit - how to choose components?

When a buyer walks into a computer hardware store and sees the breadth of choice of motherboards, processors, video cards and other components, it seems to him that in order to connect all these devices together he needs to have at least a doctorate in technical sciences. But not everything is so bad, computer hardware manufacturers took care of us and many years ago adopted a single standard - Advanced Technology Extended, which unifies all the computer hardware.
Selecting components is the most difficult task when assembling a PC, much more labor-intensive than connecting them together, but this material is dedicated to the latter task, and you can find a comparison of the characteristics of video cards and processors in our other publications.

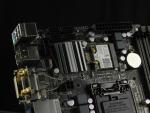
The basis of our entire future system is the motherboard, as its name suggests. It has virtually no effect on performance, but is responsible for the proper operation of all components of our computer.
The entire process of assembling a PC essentially consists of connecting components using connectors and wires to the board, and therefore you should first evaluate what kind of computer you would like to have as an output and, based on this, choose a motherboard with a certain number of RAM cells suitable for desired processor socket and so on. Another important characteristic of the motherboard is the form factor - the size of the case you will need depends on it, so be careful and when purchasing a large E-ATX board, do not expect to fit it into a compact case.
Installation of the processor, RAM and cooling system.
To build a computer at home, we suggest starting with an “open bench” rather than immediately installing your components into the case without knowing whether the system works or not. The process is as follows: we connect all our parts to the motherboard, update the board firmware, install the operating system and test the resulting assembly for errors and conflicts. If they are not identified, then we are happy to install it all in the case.
Let's start the process by installing the heart of our future PC - the processor. We must remember that the two market leaders in processor production - AMD and Intel - fundamentally use different socket designs; the former have the contact pins on the processor, while the latter prefer to place them in the socket.

To install an AMD processor, you need to lift the metal lever, insert the legs into the holes provided for them, and then return the lever to its original position. Thus, we will close the processor contacts with the socket contacts and securely fix this position.

When installing Intel, you should lift the lever and the clamping cover, and after installing the processor, do these steps in reverse order. Both types of processors should be installed in a strictly defined position, which is indicated by arrows on the processor itself and the motherboard socket.

As for cooling the processor, you need to remember that they are all installed differently and the only reasonable action would be to strictly follow the instructions. For example, AMD has a passion for fasteners using plastic lugs, while Intel, in principle, does not use such a design solution. In general, most processor coolers are quite universal, and therefore can work with chipsets from both companies, but be careful when choosing - there are also models that are loyal to only one brand.

Do not forget that many coolers can be installed in two positions, which determines which wall the heated air will exit through - the back or the top. Therefore, before installation, weigh the potency of both options and your body and choose the most productive one.

After we have secured the radiator and installed the fan on it, all that remains is to connect the power connector to the corresponding connector on the board, called CPU_FAN. More expensive motherboards can provide two similar connectors designed for two coolers at once.
So, to complete the initial work, all we have to do is install the RAM modules into the DIMM slots. Each stick has a security key that prevents you from inserting it the wrong way round; also, you will not be able to insert memory of one type, for example DDR3, into a slot on the motherboard that is not intended for it. Thus, installing RAM is the simplest process in the algorithm for assembling a personal computer.

Most processors have a dual-channel set of RAM, and therefore it is recommended to insert an even number of sticks. It must be remembered that a fairly large processor cooler may block the RAM slots on some motherboards, and therefore it is worth thoroughly studying their compatibility before purchasing.
Applying thermal paste to the processor
Many beginners make a common mistake and think that assembly consists solely of assembling parts a la a construction set. No less important for the performance of the processor than itself and the cooling system is thermal paste, which helps their tandem demonstrate maximum performance. As a rule, a small layer is already applied to the fan base, so this is not necessary during first assembly.

However, if it is missing, simply add a couple of drops of the composition and spread them in an even layer over the area of the heat distribution cover of the CPU. On the contrary, excess will reduce the thermal conductivity between the processor and the cooler, which will negatively affect the performance of the computer. If you decide to assemble a computer with your own hands, then at least do not harm it.
Installing the motherboard into the case
The main line when choosing a case for you should be the one that is responsible for the supported form factors of the motherboards. The following are the maximum possible sizes of installed components - believe me, when the time comes for wiring, you will thank yourself for choosing the most comfortable case in which you can install all the desired hardware without unnecessary manipulations.

To install the motherboard, you first need to tighten the external and internal threaded mounting nuts. As a rule, all the bolts and nuts come with the housing, they are standardized, so it is unlikely that you will need to look for something unique to install your assembly. Having secured the plugs and tightened the nuts, you can move on.
Connecting Case Controls to the Motherboard
The panel of a standard case is usually equipped with on/off buttons, as well as USB ports and a headphone jack. As a rule, these interfaces are located at the bottom of the motherboard, and therefore we find them and connect them to the case.

The set of wires is very standard:
- PWR_SW is responsible for the on/off button;
- RESET_SW activates the reset key;
- HDD_LED (“plus” and “minus”) activates the drive activity indicator;
- PWR_LED (“plus” and “minus”) is responsible for the operation of the computer status indicator.
Installing the power supply
It's time to install the power supply and connect the cables to the motherboard. All connectors have keys that will prevent incorrect connection, so even an inexperienced user can handle it. Each connector speaks for itself, and if it says SATA on it, then it is probably intended for a device with the same interface.

Recently, the power supply compartment has been located at the bottom of the case for better ventilation, so make sure that the wires are long enough for components located in the part of the video card remote from the unit. After installing the unit, we stretch two main cables - a 24-pin cable to the motherboard itself and an 8-pin cable to the processor. When purchasing a power supply, we advise you to immediately purchase a bundle of nylon ties so that your bundle does not get confused between PC parts.

Installing drives
There are several drive form factors: 2.5-inch, 3.5-inch and solid-state drives with an M2 connector. The latter are installed on the motherboard itself, but the first two must first be installed in the case.

Installing a drive into a slot with a slide is as simple as installing RAM, and therefore we will not dwell on this point in detail. All that remains is to connect cables to them from the motherboard and power supply unit, which have a SATA connector.

If you want to install an optical drive, then the algorithm is the same - we fix it in the 5.25-inch bay, remove the front plug and supply power.
Installing a video card
Since we set out to assemble a PC correctly, we cannot do without a paragraph dedicated to the video card. It is installed last and the power cables are pre-wired for it. The graphics accelerator needs to be installed in the very first PCI Express x16 port, but modern video cards take up two or even three slots, so access to the downstream port will be blocked.

After these procedures, all that remains is to remove the two plugs on which the radiator will be installed, and also tightly screw the video card to the motherboard and the back cover of the case. The number of power cables will depend on the power of the video card and in extreme cases you will have to add cables to the power supply or use adapters.
Laying cables and completing work
The entire list of components has been combined into a single system, so it’s time to put the finishing touches on it. If the assembly is standard, then you just need to choose what to connect the coolers to: the motherboard, reobass or power supply. After this, you just need to carefully lay the remaining cables and tie them with nylon ties, and then close the housing cover.

After that, we connect a monitor and other peripherals to the system unit, install the operating system and use the brand new assembled computer.
We hope that our material on how to assemble a computer yourself will help you save money and choose the most successful combination of elements, without paying attention to the tricks of computer equipment sellers!
Similar articles
 How to open a PSD file without Photoshop How to open a PSD file other than Photoshop
 Online computer configurators with checking component compatibility
 Split Screen What is Snap Assist?
 Arranging windows in Windows using Snap What is multi-screen mode and why is it needed
 The best programs for reading and editing: we do without Photoshop
 Instructions for resetting your Windows password or what to do if you forgot your password Forgot your Microsoft account information
 How to recover your Microsoft account password - Step-by-step examples
 Extract a page from a PDF file online
 How to unlock a found iPhone
 How to type characters and signs that are not on the keyboard